When I think of classic pub fare sandwiches, I think: French dip.
Slow chunks of roast beef in a hefty bun with ‘au jus’ for dipping. Messy. Filling. Comfort sandwich.
But, too many times, the French dip on offering in pubs disappoints. I’m talking grey, grisly, dry pieces of roast beef and a thin, high sodium excuse for ‘au jus’.
Not here. Today I’m making my version of a French dip that features moist, succulent beef in a fresh, sturdy Italian roll, dipped in a beef broth that’s so well balanced, you could serve it as a cup of soup.
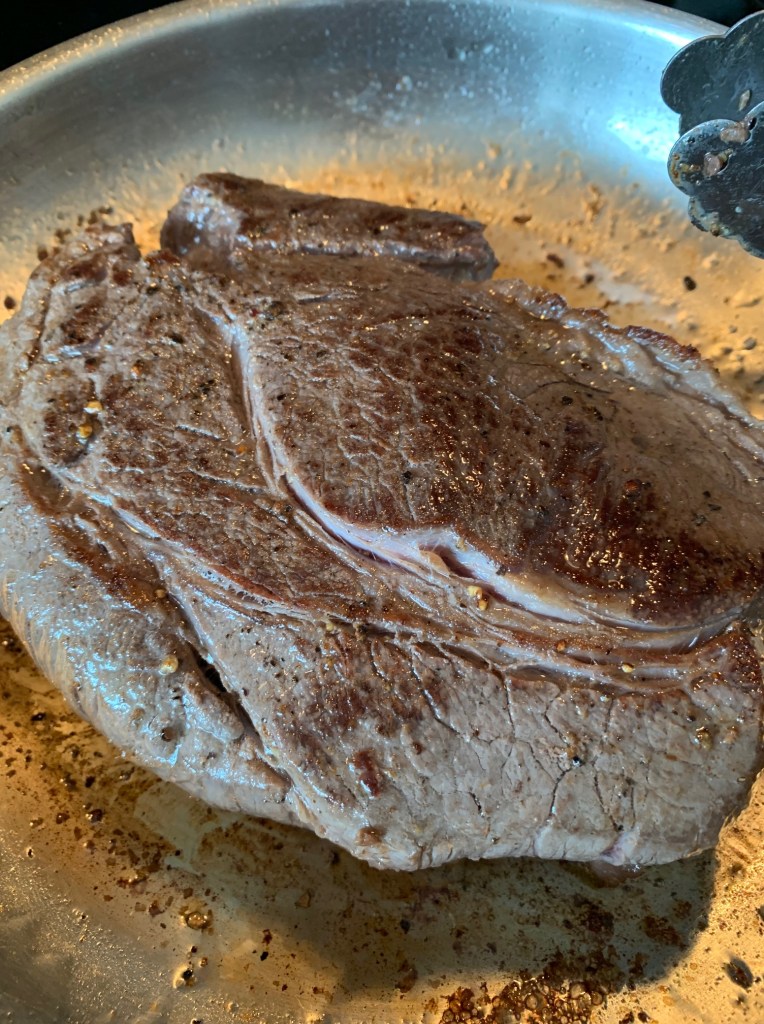
It starts with a quality cut roast beef. I’ve experimented with two kinds—eye of round and chuck. Believe me, chuck is far better suited to the French dip. So here’s my star chuck roast, seasoned with kosher salt and fresh ground pepper. Into a high heat pan with neutral oil it goes. The job is to sear all sides of this roast so that the browning of the beef adds flavour and seals in the moisture. Get out your big tongs for this 10-minute job.
Once the roast is seared on all sides, we’re going to put it into a slow cooker with veggies. Think about it as though you’re making a beef stew: here I’ve got chunks of sweet potato, celery, onion, and a bay leaf ready for action.
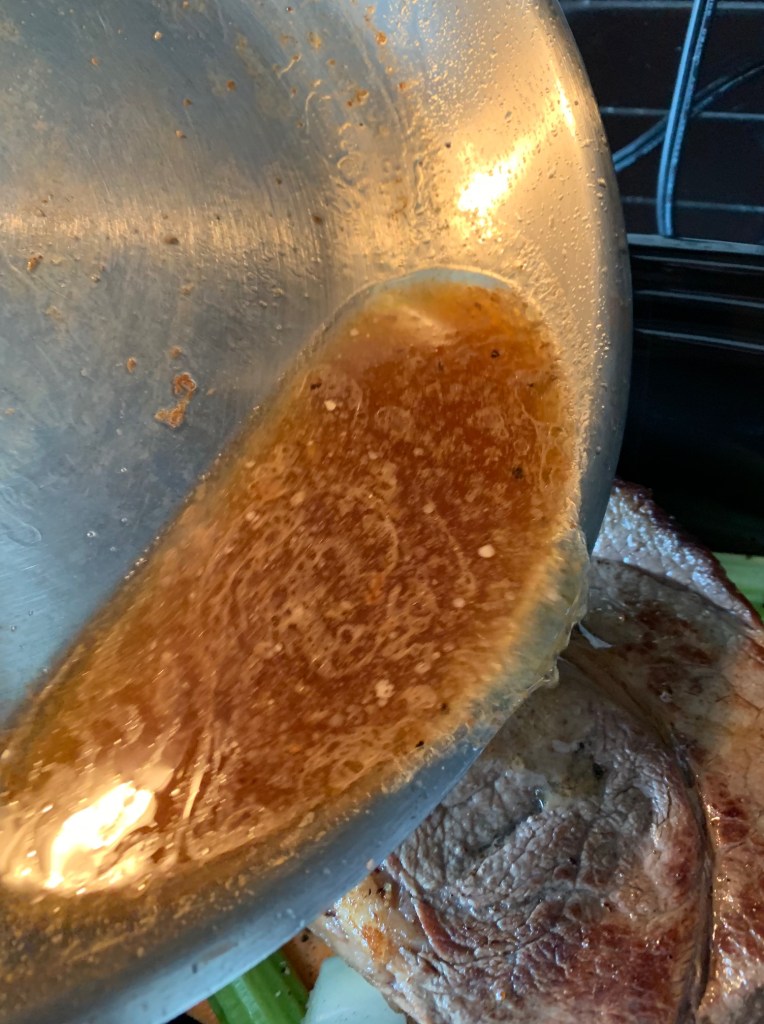
That’s my flavour base. Once my roast is seared, I place it on the bed of veggies and return to my frying pan. There are brown bits from the roast that I want incorporated into my stew, so I deglaze the pan with 1 cup of beef broth, scraping up all of those brown bits. It’s ready to go into the slow cooker.
Look at that golden brown broth. That’s packing a ton of flavour. To add more flavour and up my ‘au jus’ game, I pour in two more cups of beef broth, 1/3 cup tamari, and 2 tbsp of balsamic vinegar. I set my slow cooker at high heat and let that stew for 5 hours.
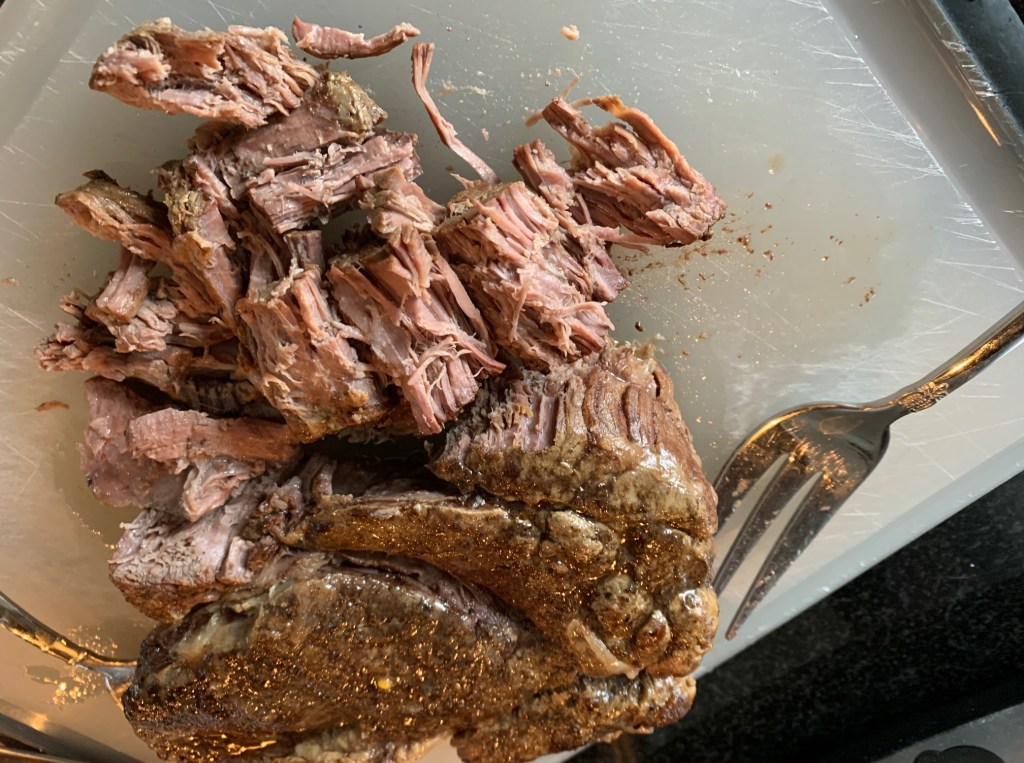
The stew is ready, so now it’s about building my sandwich. Remove the roast from the slow cooker and, using forks, tear it into bite-sized chunks.
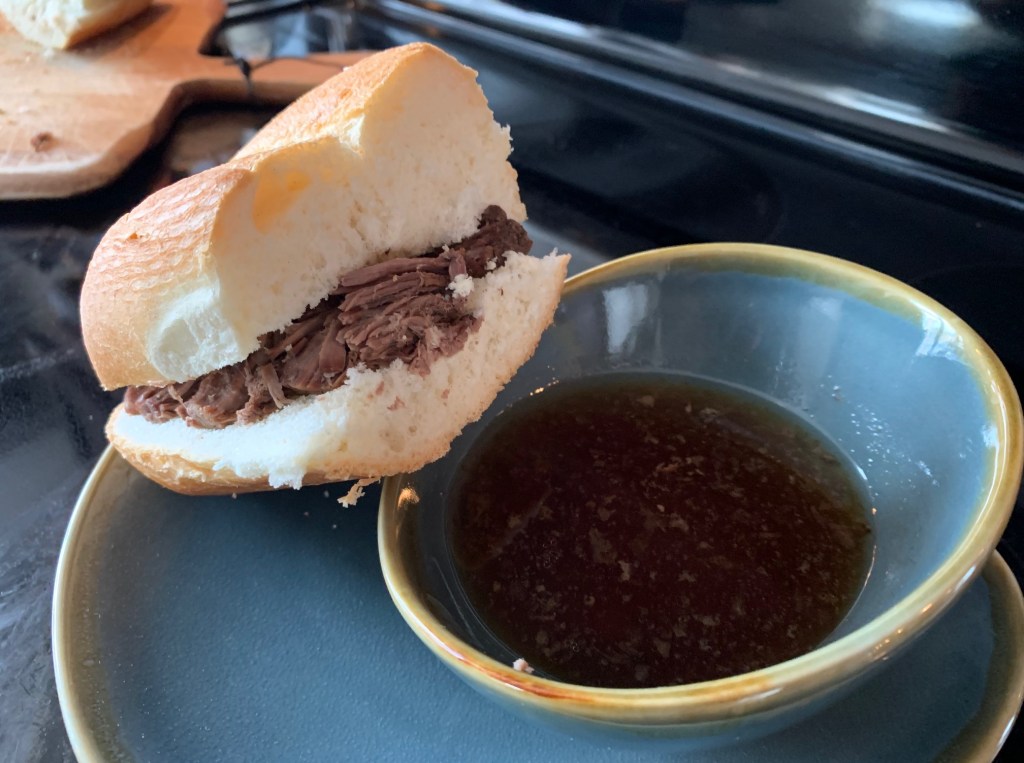
I’m using a fresh Italian bun from my local Italian grocery provider, Mia Casa. Pile the beef into the bun, skim the fat off of the broth, then ladle broth into a cup, and dip away.
A hearty, rich broth that is so good, you’ll keep dipping with every bite. And you’ll wonder why you order French beef dip in a pub forever more. Lots of good leftovers for more sandwiches, too, or turn the broth and beef into a beef barley soup. Old school comfort. Also, an easy way to feed a crowd.
The breakfast sandwich is a beautiful thing: egg, cheese, some kind of umami addition, and great bread. What’s not to love?
I recently came across an egg sandwich in Toronto’s Kensington market that made me totally rethink my breakfast sandwich game. Egg Bae serves up a breakfast sandwich on a sweet eggy bun with soft scrambled eggs, a dollop of sweet caramelized onion, and a blanket of Muenster cheese. It is heavenly.
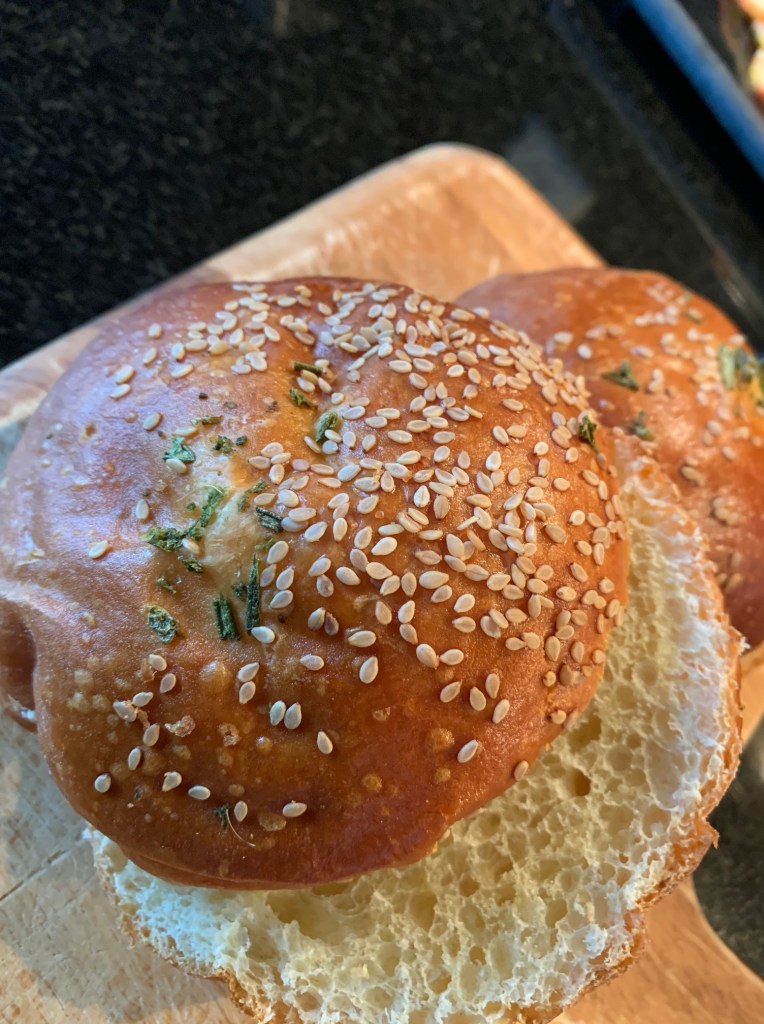
Here’s my version, without sugar. I start with Ace Bakery buns, which I’ve only ever used as my go-to hamburger bun (wait for this summer’s ultimate hamburger recipe) but it’s a perfect replacement for Egg Bae’s sweeter bun.
It’s got a brioche character to it, a golden crust, and crunchy sesame seeds. So good. I stop at a cheese shop in Kensington market to buy a block of Muenster cheese, which I’ve never dealt with before but it’s nutty and buttery like an Edam and when it melts, it’s slinky, divine. I’m putting two thin slices per sandwich.
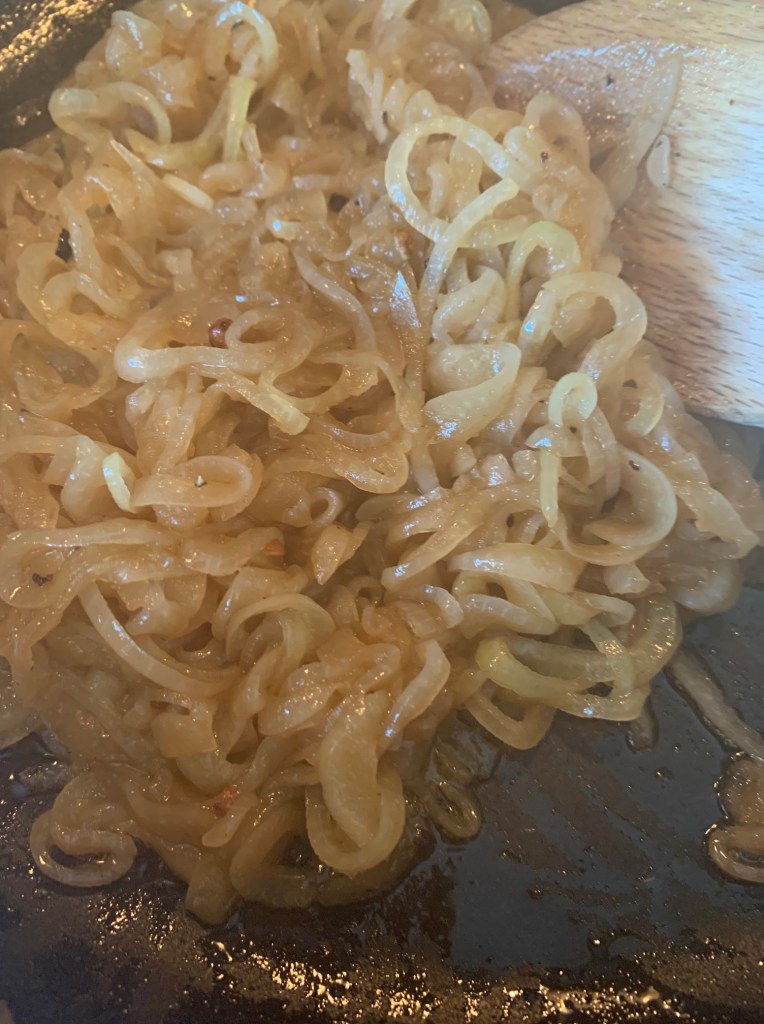
The day before I made a batch of caramelized onions which is just always great to have on hand. I put them in sour cream for a great chip dip. They can go in a casserole, with pasta. They’re a great flavour boost.
Now I have a bone to pick with most caramelized onion treatments: they include sugar, which I don’t think is necessary. My caramelized onions involve: three finely shredded onions (mandoline comes in handy here), two tablespoons of olive oil, salt & pepper, and in the last few minutes, about three tablespoons of balsamic vinegar, which gets reduced and turns naturally sweet.
Look at that golden deliciousness. It’s a commitment: I spent about 20 minutes over medium heat breaking these down, my hair smells like an onion factory, and it’s worth it.
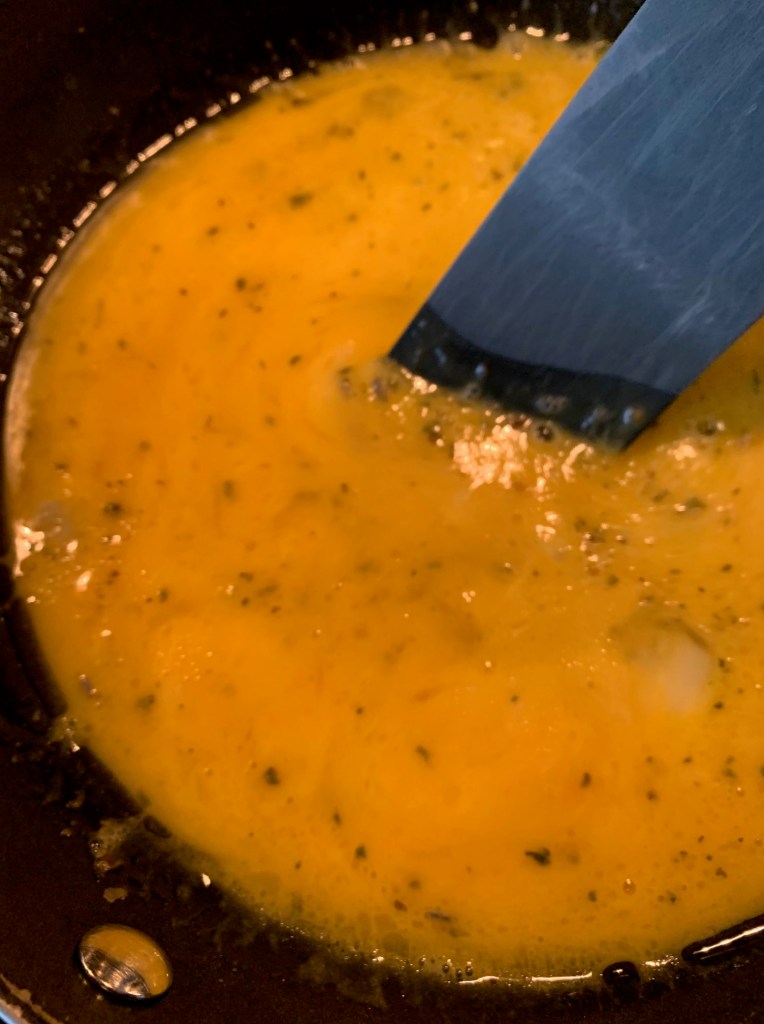
Now for the star of the show and something I’ve never made before: soft scrambled egg. So normally I treat the scrambled egg like it can handle roughness. I whisk the eggs, season them with salt & pepper, maybe add a dash of cream, and let it set until it starts cooking at the bottom, flip it around and break it up until it’s set and browned. That is not how to make a soft scrambled egg.
A soft scrambled egg is a delicate thing. You’re trying to create curds, not a broken down failed omelette. I scour You Tube for guidance. Gordon Ramsay’s version is interesting but he uses more butter than I’d like and undercooks it just a score less than I’m signing up for. Bon Appetit gives me the guidance I’m seeking, although I never achieve this look.
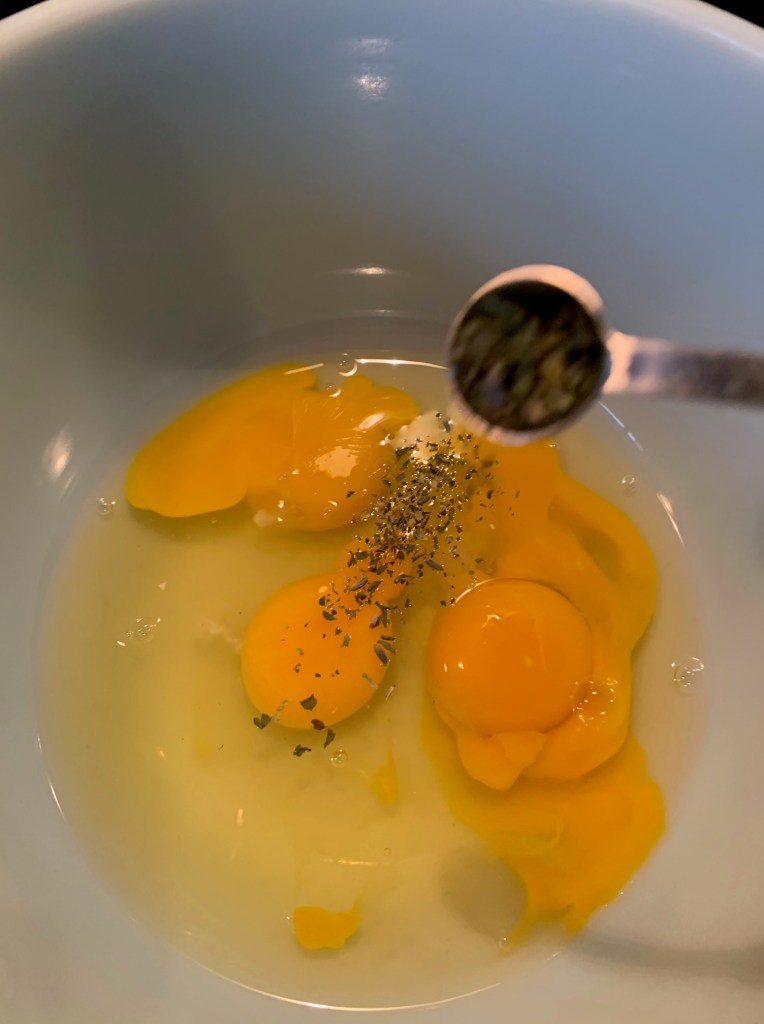
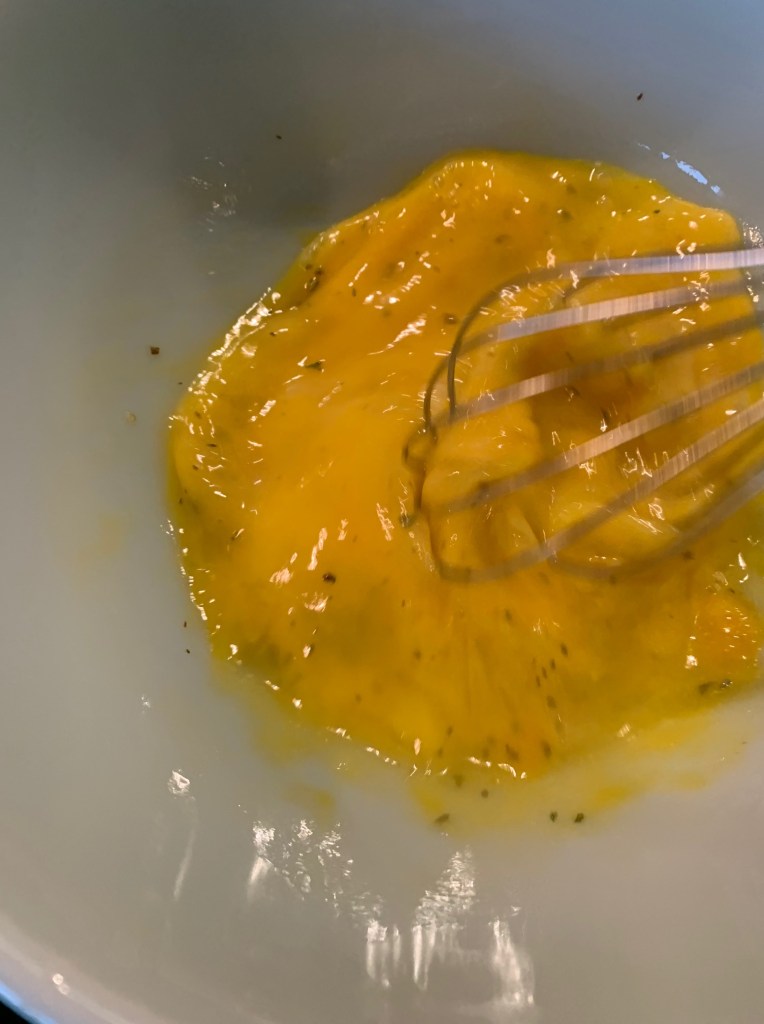
I start with four eggs with 1/4 tsp herbes de provence.
Whisk until it binds and no more.
Place a large pat of butter into a non-stick fry pan at medium-high heat and, once the butter has melted, pour those eggs into the pan.
You can see to the left of my pan that I’ve already prepared my buns for the sandwich: spread some mayo at the bottom of the bun, add a healthy dollop of caramelized onion and keep nearby for easy plating.
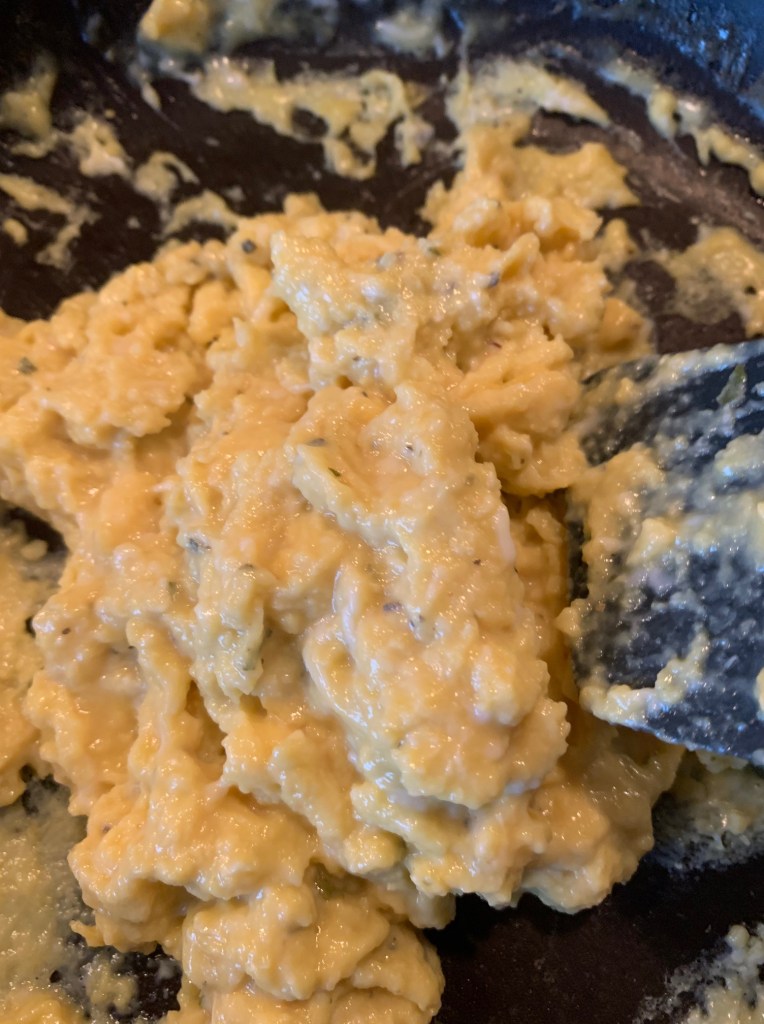
My eggs are in the pan and now this is a full-time job to keep cross hatching those eggs with a spatula to help them cook into curds and not an omelette. Occasionally, I remove the pan from the heat and keep cross-stirring to fully incorporate the egg mixture before returning to heat.
It only takes a few minutes of concentrated effort until, voila! Soft scrambled eggs.
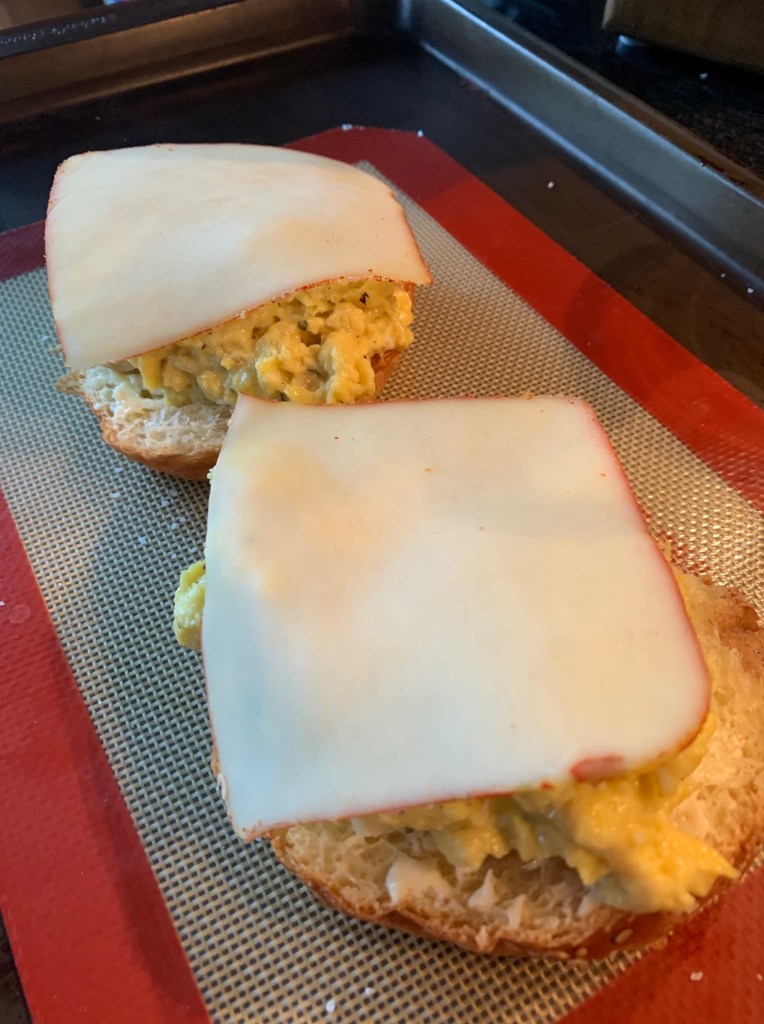
Spoon half of the mixture onto that bottom half of the bun, drape two slices of Muenster cheese, and pop that under the broiler for 30 seconds—just enough to wilt the cheese.
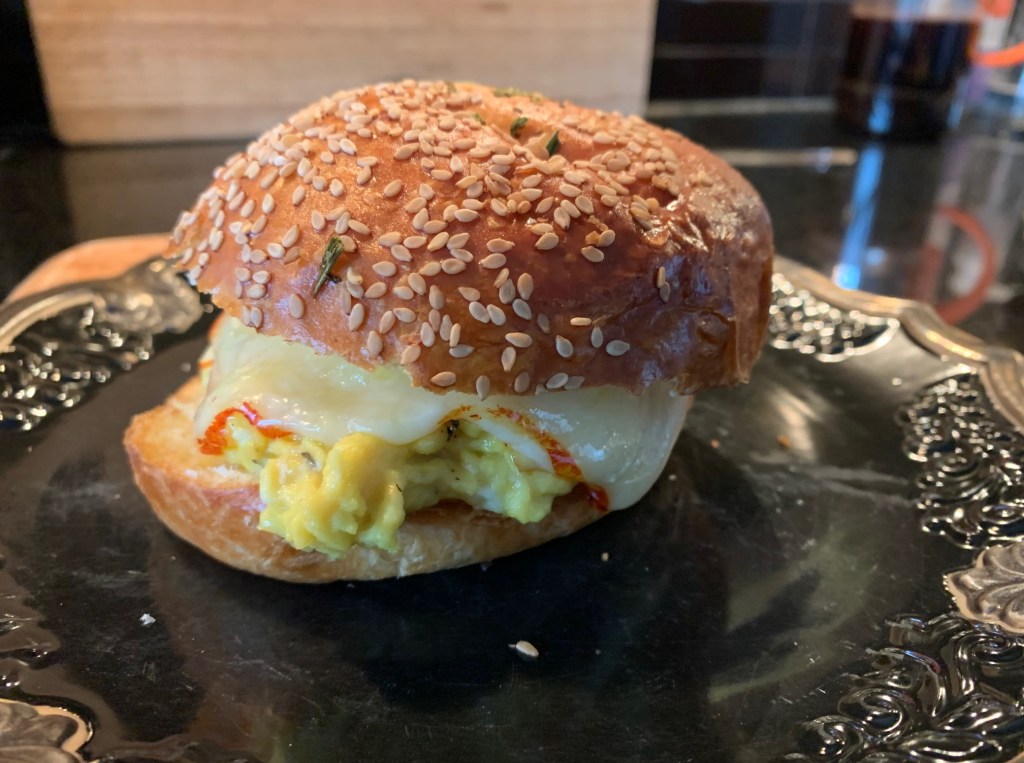
That broiler does the cheese trick and helps the eggs set a bit. Remove from broiler, add the top buttered bun and you have got one elegant looking breakfast sandwich.
That is a glorious sandwich right there. The unctuousness of the soft scrambled egg, the slight sharpness of the melted Muenster, the salty sweet addition of caramelized onions, and a perfect bun. What a great way to start the day.
I’m making 52 sandwiches this year as part of my hobby blog and I’m teeming with contenders for breakfast, beef, and veggie sandwiches—but what about seafood?
Week two focused on the king of seafood sandwiches, the lobster roll, then there was the less glamorous but mainstay tuna sandwich hold the mayo. I think it’s time for a shrimp sandwich; something hot and dippable.
I take my inspiration from the Chinese dim sum feature, shrimp toast, but I’m not someone who deep fries anything, let alone a sandwich. Enter Martha Stewart’s Japanese shrimp toast, which serves as a guide and I add my own twist.
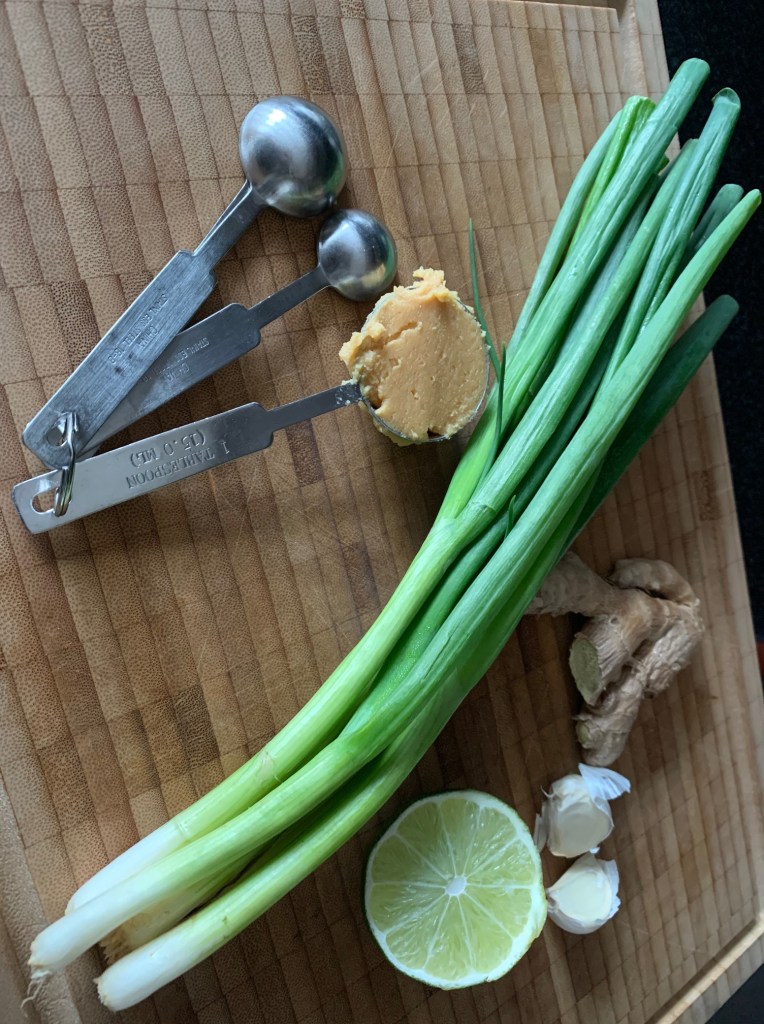
I start with my flavour base: a tablespoon of white miso, a teaspoon of minced ginger, a minced clove of garlic, a teaspoon of minced green onion for the flavour base and another teaspoon set aside for the garnish. Fresh lime for brightness.
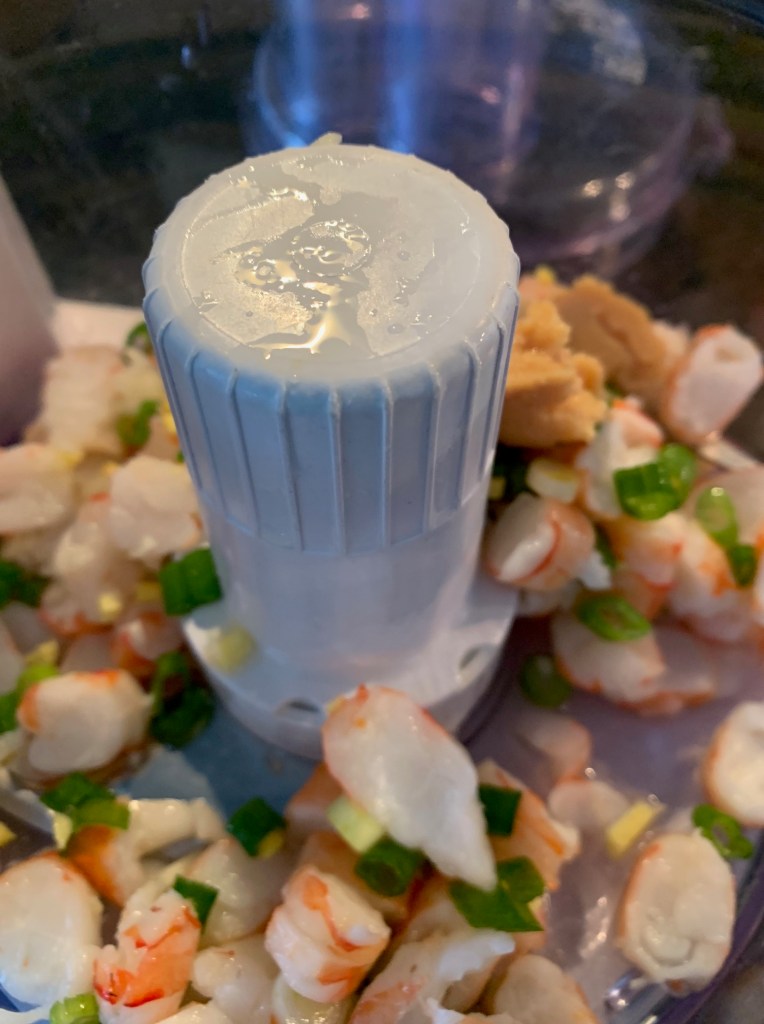
I coarsely chop a dozen cooked shrimp which will become the star of this show, and add that, along with my flavour base, into the food processor. Don’t forget to squeeze the juice of one lime into that.
Whirl that into a paste.
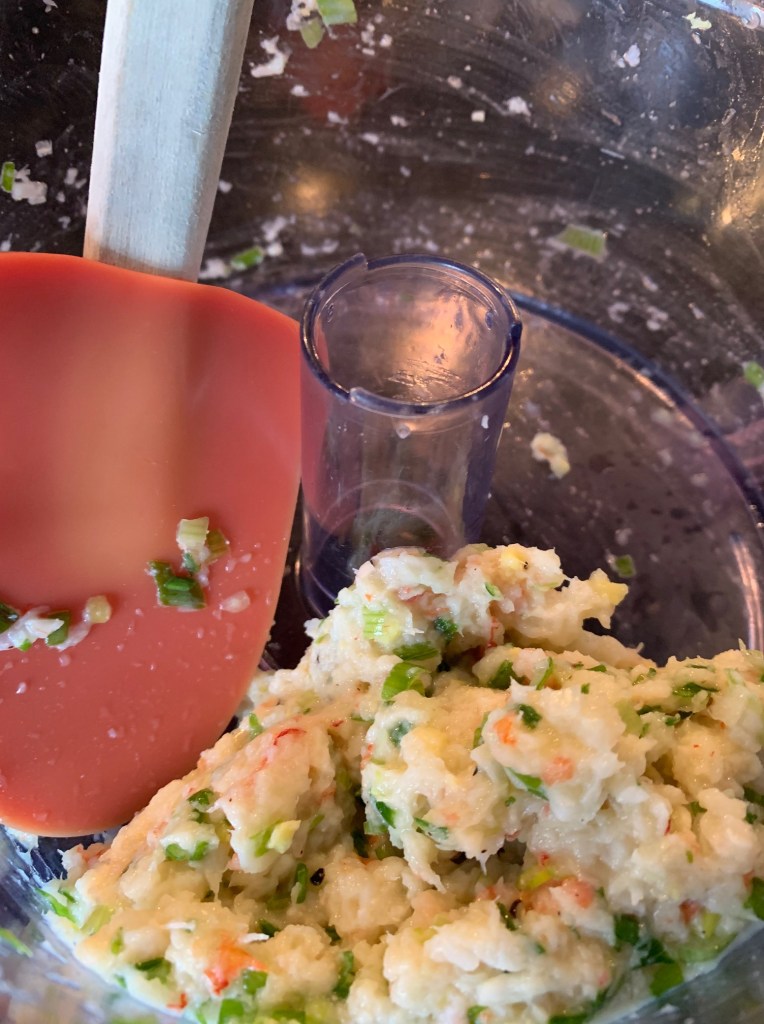
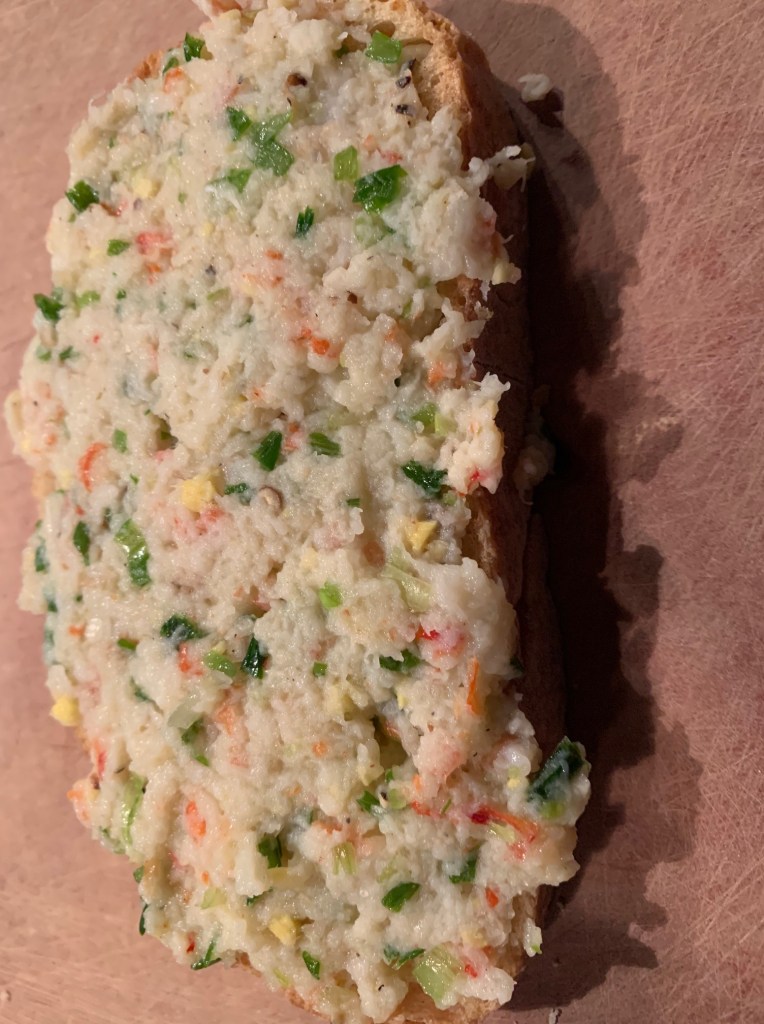
I’m looking at this paste and decide it needs a binder, so I add a healthy tablespoon of mayo, then spread that paste onto a slice of crusty bread (Italian, sourdough all good).
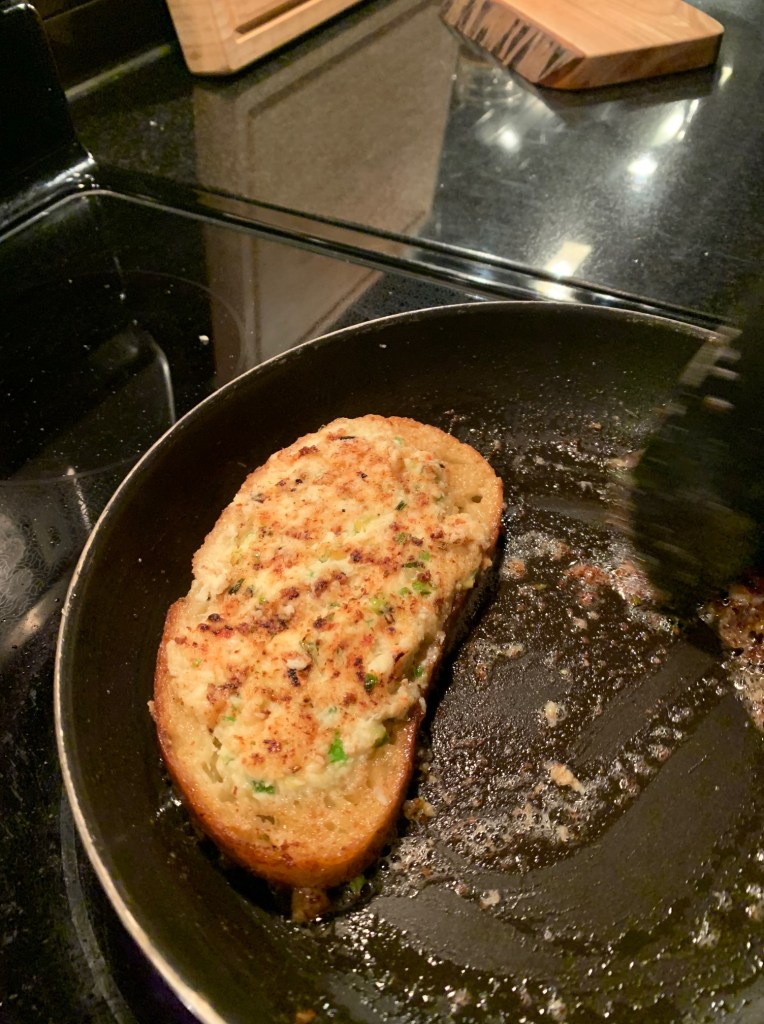
Now for the tricky part: place the shrimp toast paste side down into a hot non-stick fry pan at medium-high temperature, ensuring the paste doesn’t slip away from the bread. In all shrimp toast recipes that I’ve read, they call for a lot of oil. With this sandwich, I use about 4 tablespoons of grapeseed oil—much less than the rest, but still a lot in my books.
Once the shrimp paste turns golden, carefully flip it so the toast can get golden too.
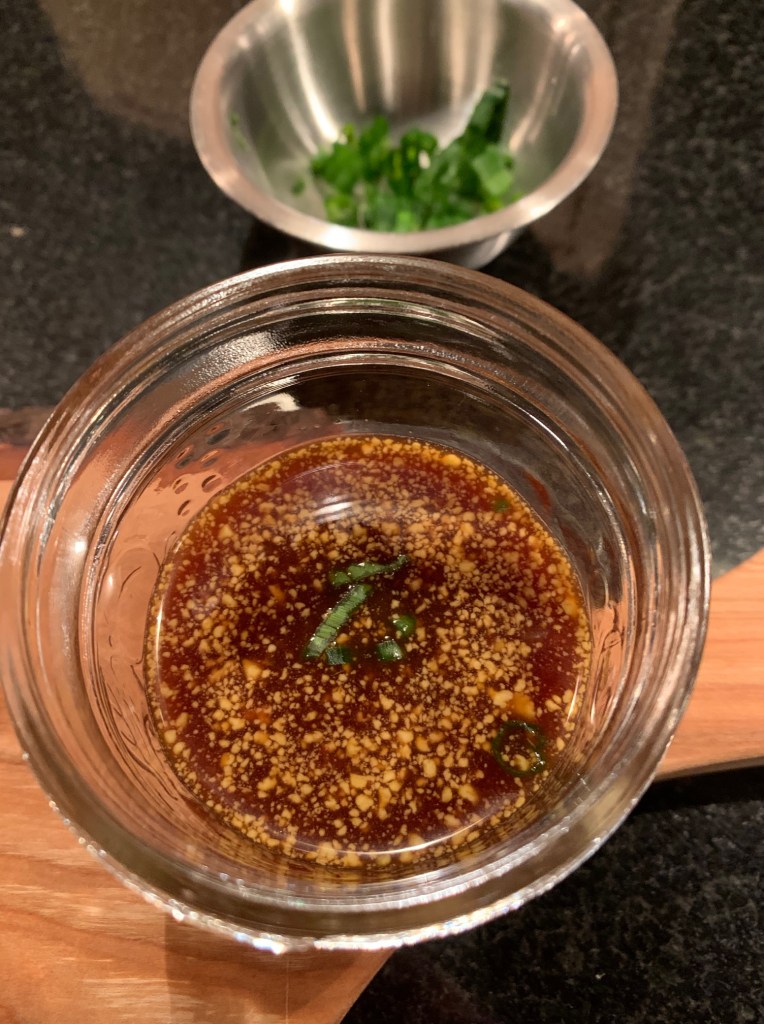
When this sandwich is ready (it doesn’t take long on the stovetop) I want to serve it with a side dip, so I make one out of the juice of one meyer lemon, 1/3 cup tamari, and a half teaspoon of wasabi paste for a heat kick; green onion for garnish.
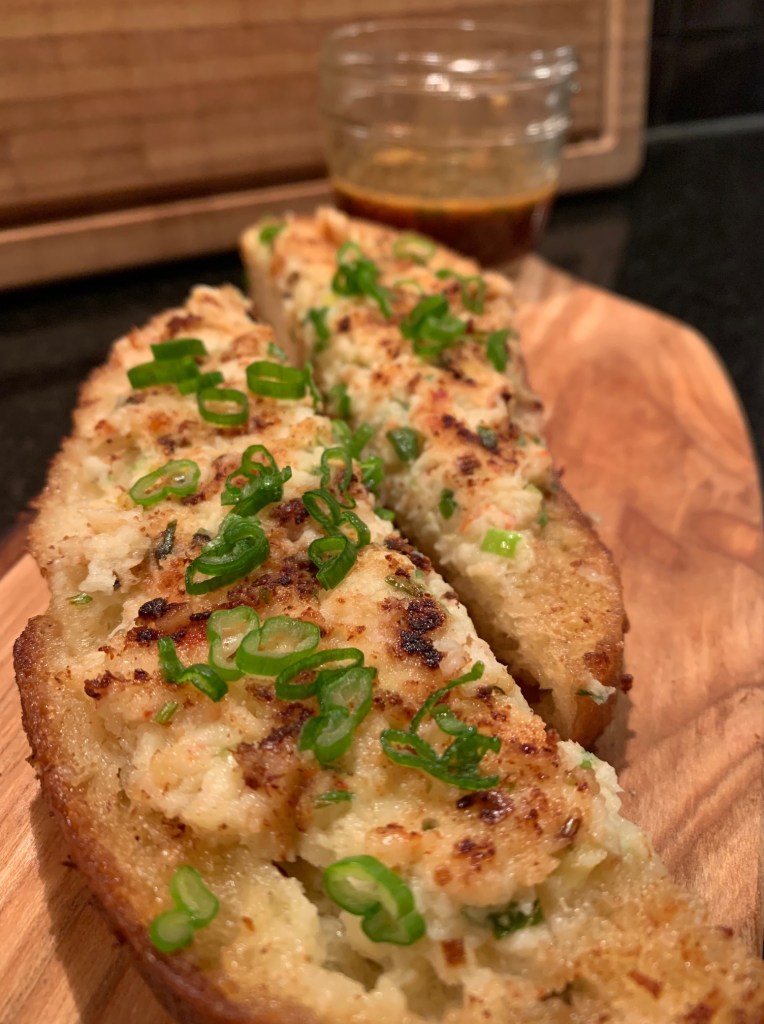
My shrimp toast is ready for plating.
It’s salty, savoury, and thanks to the fry treatment, rich at the same time. Like many sandwiches, the sum is definitely greater than the parts. Sliced in strips with the dip it could double as an excellent appetizer course.
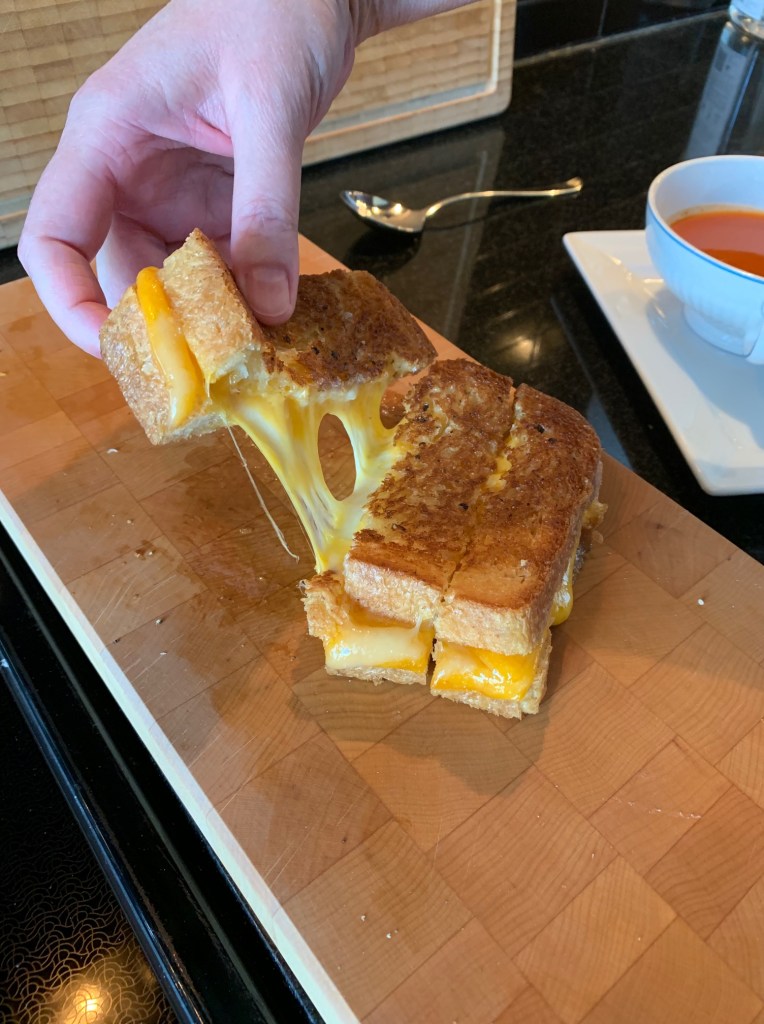
I’m making 52 sandwiches this year and you know that childhood comfort food, the grilled cheese, is going to make at least one appearance.
I decide this week is going to be a battle of two grilled cheeses.
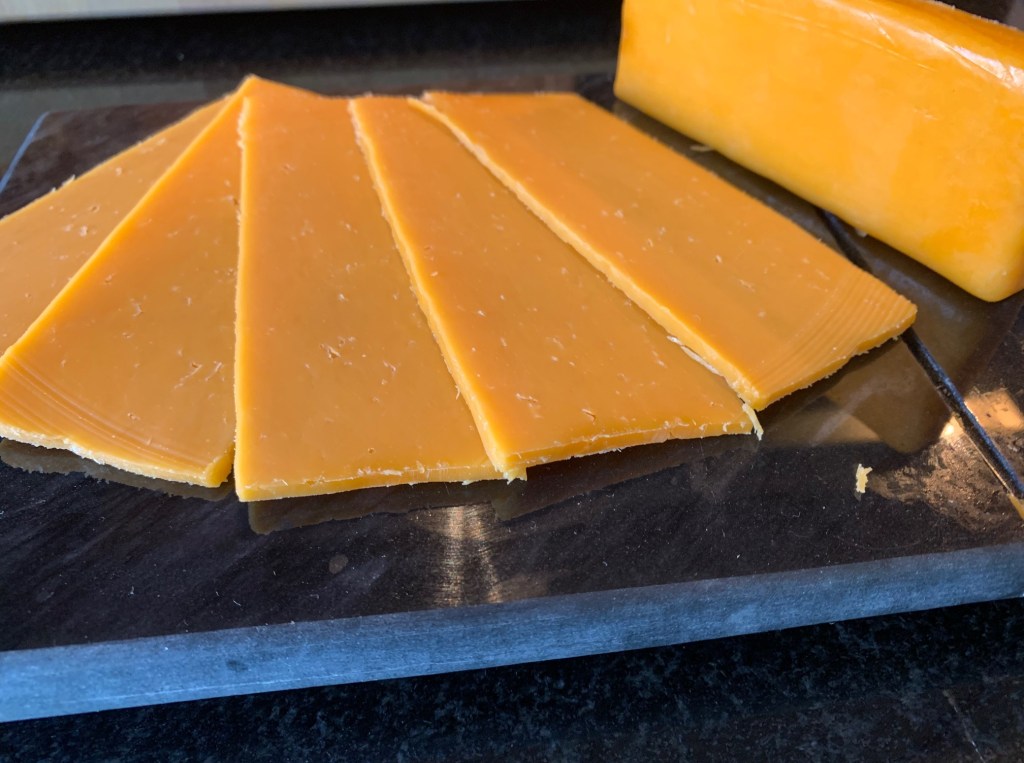
Contender #1: The “grilled cheez”, the one many of us grew up with. Bread, butter, processed sliced cheese that’s not really cheese.
Contender #2: The “chef’s grilled cheese”, inspired by chef Roy Choi’s version depicted in this scene in the movie Chef. Bread, butter, neutral oil, more butter, two types of thinly sliced real cheese (I choose colby and havarti).
Which one pairs best with that other childhood classic, a nice warm bowl of Campbell’s tomato soup?
Up first: Grilled cheez. Both start with beautiful slice of brioche bread from Cliffside’s Hearth, a small batch bakery that makes everything from scratch. It’s buttery, soft, and it’ll make a perfect base for these sandwiches.
Bread gets a generous spread of butter. And I do mean generous.
Two slices of processed cheez go down on the unbuttered side. Top those with another piece of bread, butter side up.
Into a non-stick pan at medium-high heat it goes.
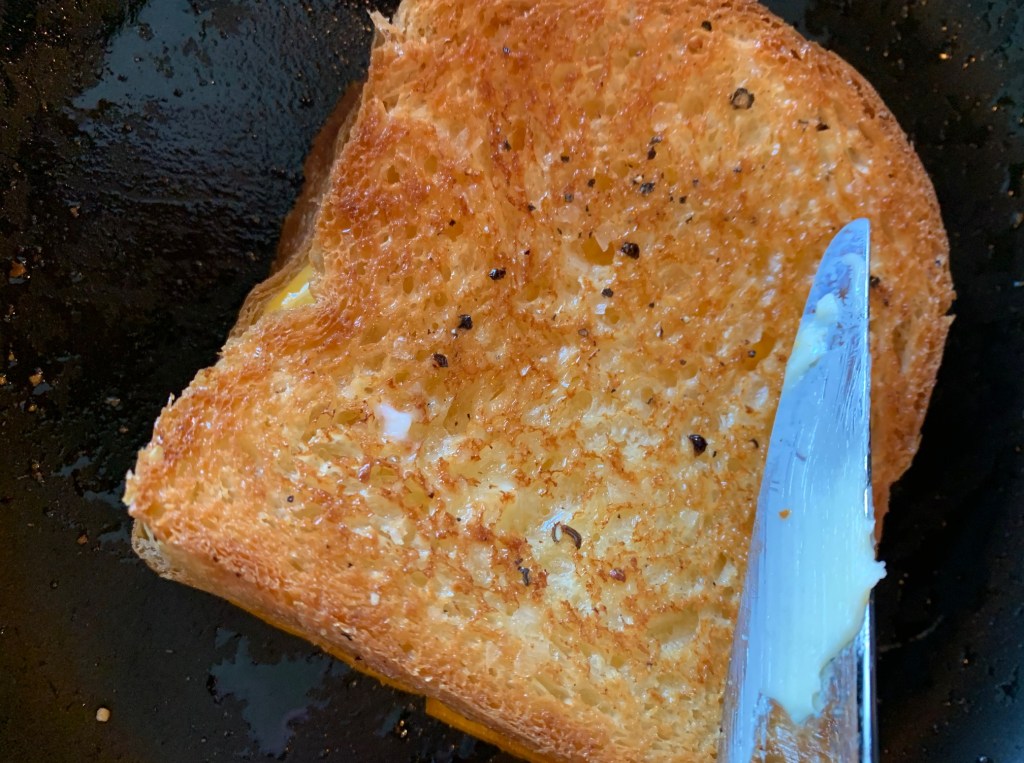
Once both sides are golden and the cheez is melted, it’s time for plating. I slice my grilled cheez into three strips and place them next to a steaming bowl of tomato soup. Ah … ooey gooey goodness. This is why I will never give up bread. This is the ultimate comfort food.
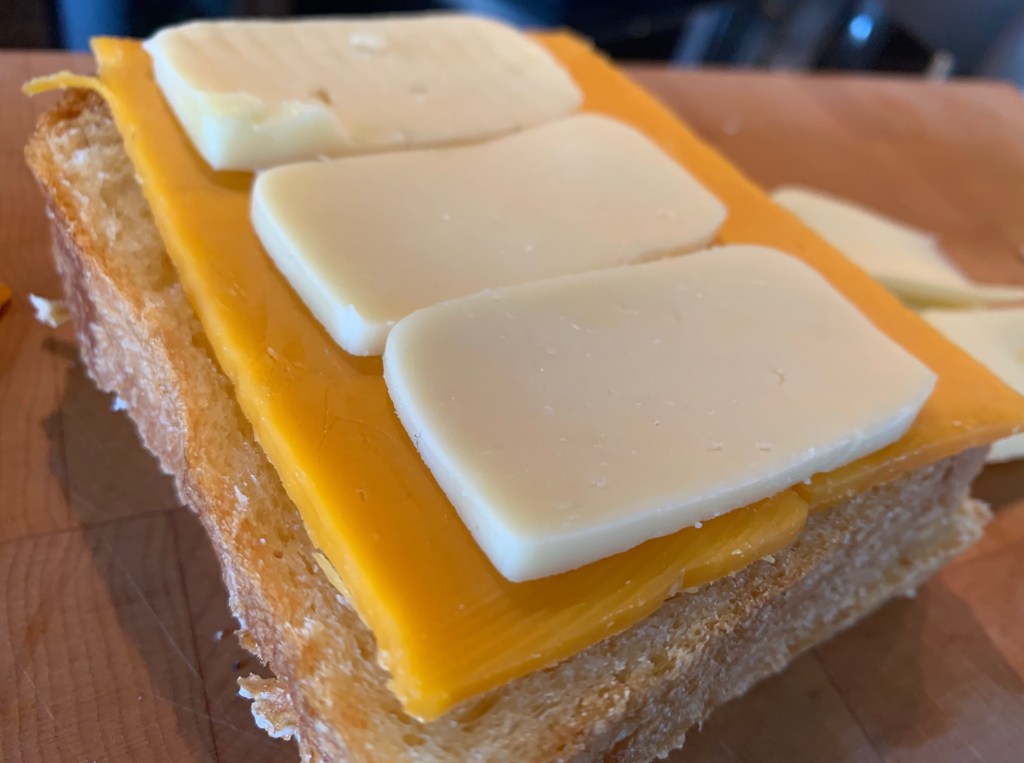
OK, time to test contender #2: the chef’s grilled cheese. Bread is buttered generously on both sides and now I slice my colby cheese, thinly.
That goes on my first slice of bread, buttered side down, then it gets topped with thinly sliced havarti. Top that with the other slice of bread, buttered side up.
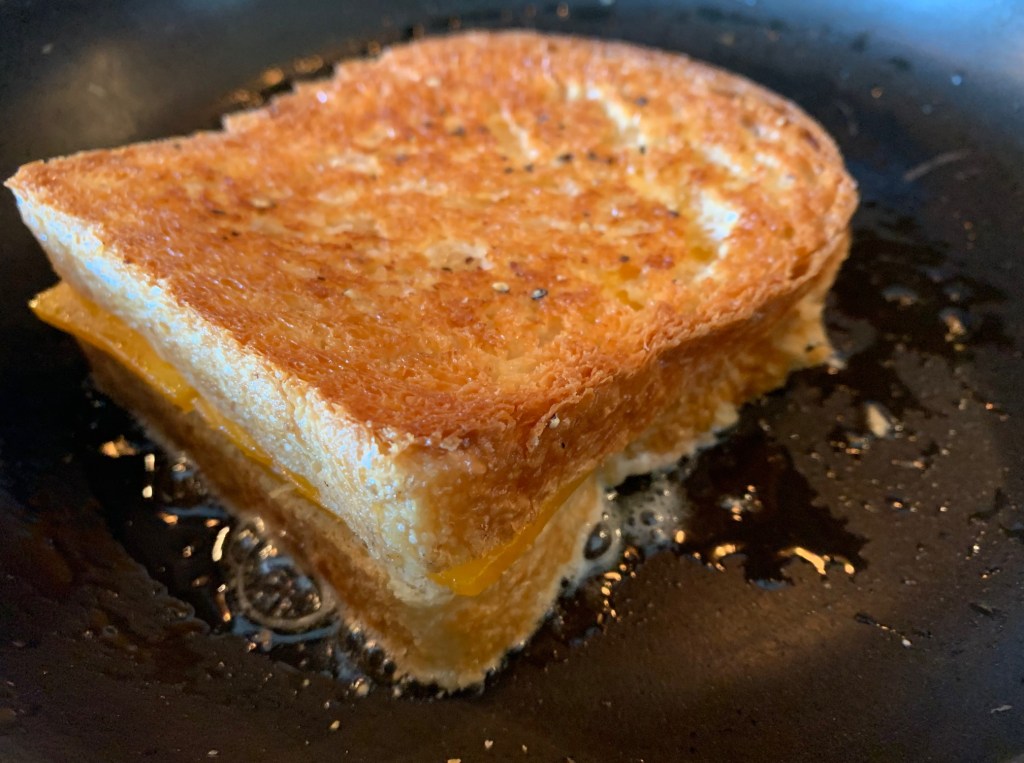
Now to drizzle a bit of grapeseed oil into the pan, at medium high. Hmmm, maybe that’s a little bit more than a drizzle.
I’ve never made this version of a grilled cheese before, and it’s more of a situation. The buttered bread is interacting with the hot oil, introducing moisture into the outside of my bread and that is taking longer to get to a golden crust. About double the time of Contender #1.
OK, my sandwich is getting golden but the cheeses aren’t melting, so now I’m worrying about burning this beautiful brioche bread because I haven’t done the final ‘chef-y’ step yet: add a bit more butter to each side of the sandwich. Here we go …
This is such decadence, but I spread a thin layer on top of both sides of the already golden bread and give each side a little more time in the pan. The cheese finally starts to ooze just in time—a minute more and I would have burned my sandwich. But look at this:
The outside of Contender #2 is golden brown, crunchy, and the inside is an inferno of hot, stringy cheese.
Which one wore it better? Contender #2 is as decadent a grilled cheese sandwich as I’ve ever had. I mean, just look at it. Craig, who shares these sandwiches with me and helps me figure out the execution of each sandwich, votes for this version. A rich chef’s grilled cheese. Maybe a little too rich for me.
I’m voting for Contender #1, a grilled cheez that is easier and faster to make, has a great ooey gooey quality to it, and takes me back to the comfort foods of my youth.
But I wouldn’t kick either one of them out of bed.
I was lunching at a diner with my friend Ricardo, a true carnivore, when it came down to the menu choice.
Q: Ricardo, what are you having? Have you seen the roast beef dip sandwich?
He hadn’t, and it was cause for pause. He asks me what I’m thinking about.
A: Maybe a tuna melt. (I LOVE a good tuna melt).
Ricardo: I don’t eat tuna.
Me: Why?
Ricardo: Cat food.
I decide to order the beef dip and Ricardo orders the Philly cheesesteak sandwich (more on both in future blog posts).
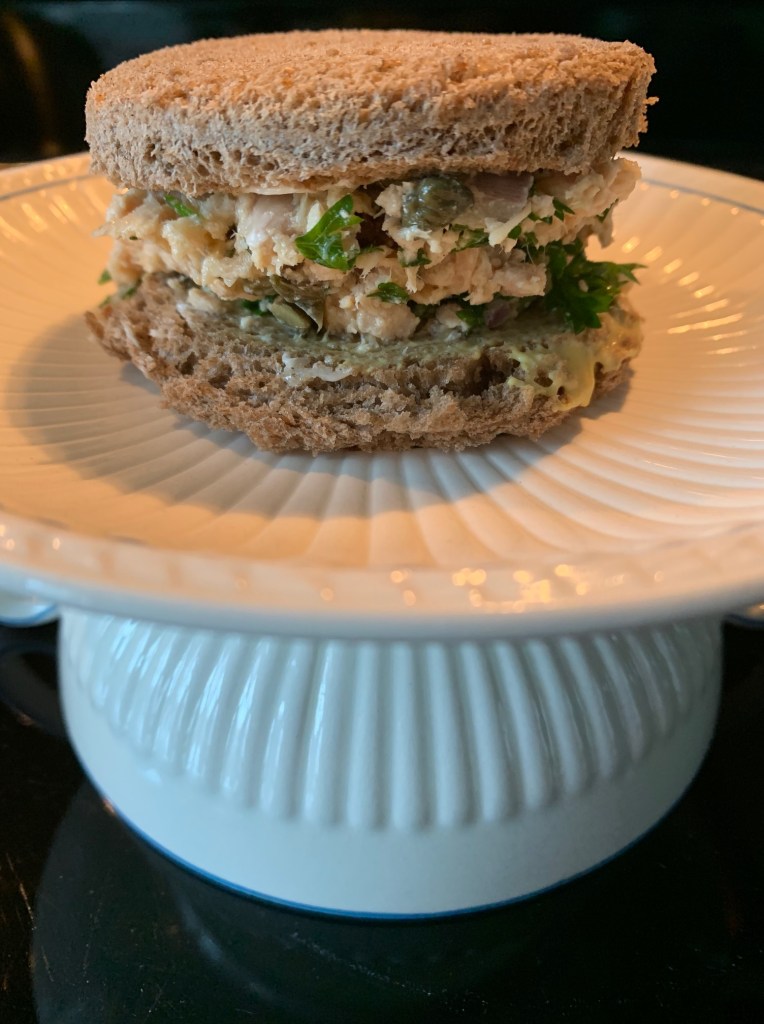
But I don’t think of tuna as cat food, if it’s done right. So I return home thinking I want a good, simple tuna sandwich evocative of Mediterranian flavours—hold the mayo. Sacrilege? Perhaps, but stay with me.
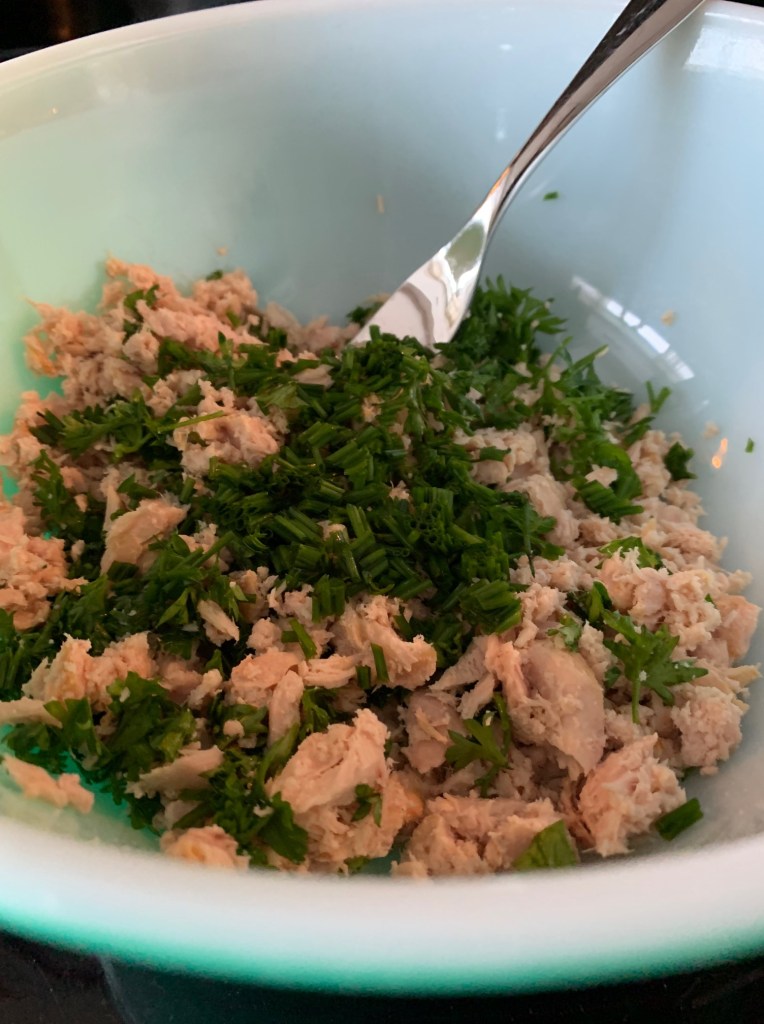
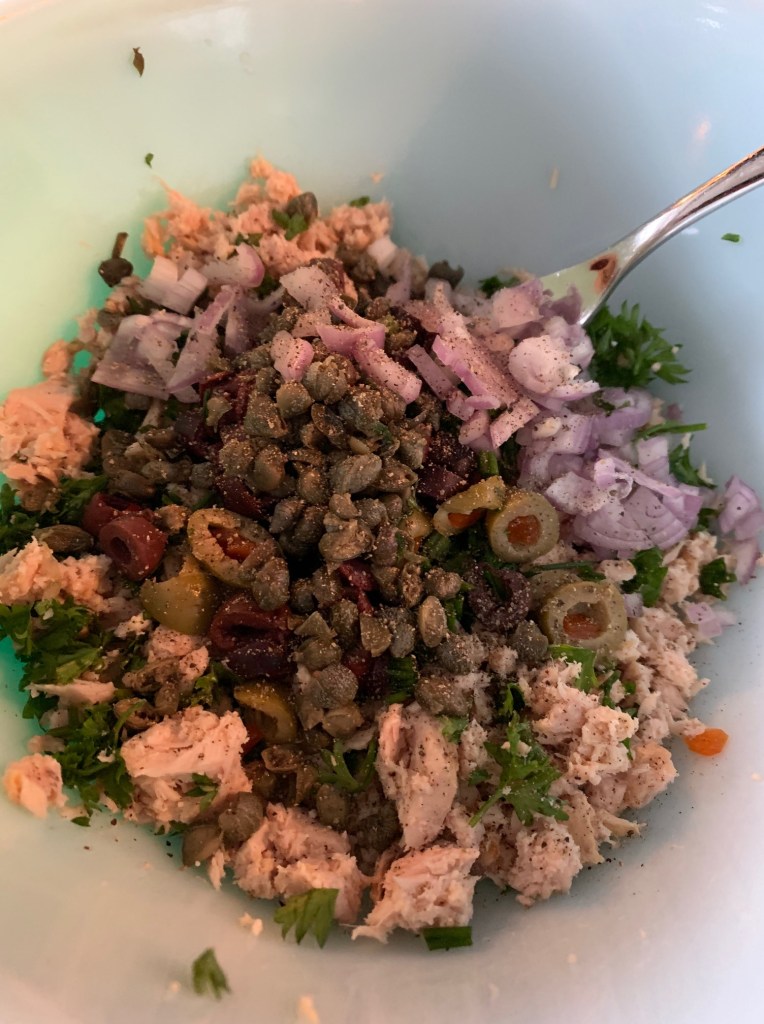
My fresh tuna salad starts with two cans of sustainably caught tuna (important!). I choose water-packed, not oil-packed, and I know this is controversial among foodies but I want to add my own oil. I drain the tuna and dowse it with the juice of one Myer lemon. I suppose a regular lemon or lime would do, but if you can find it at your grocery store, there is no substitute for the mild Myer lemon. Chopped chives and parsley go into the bowl.
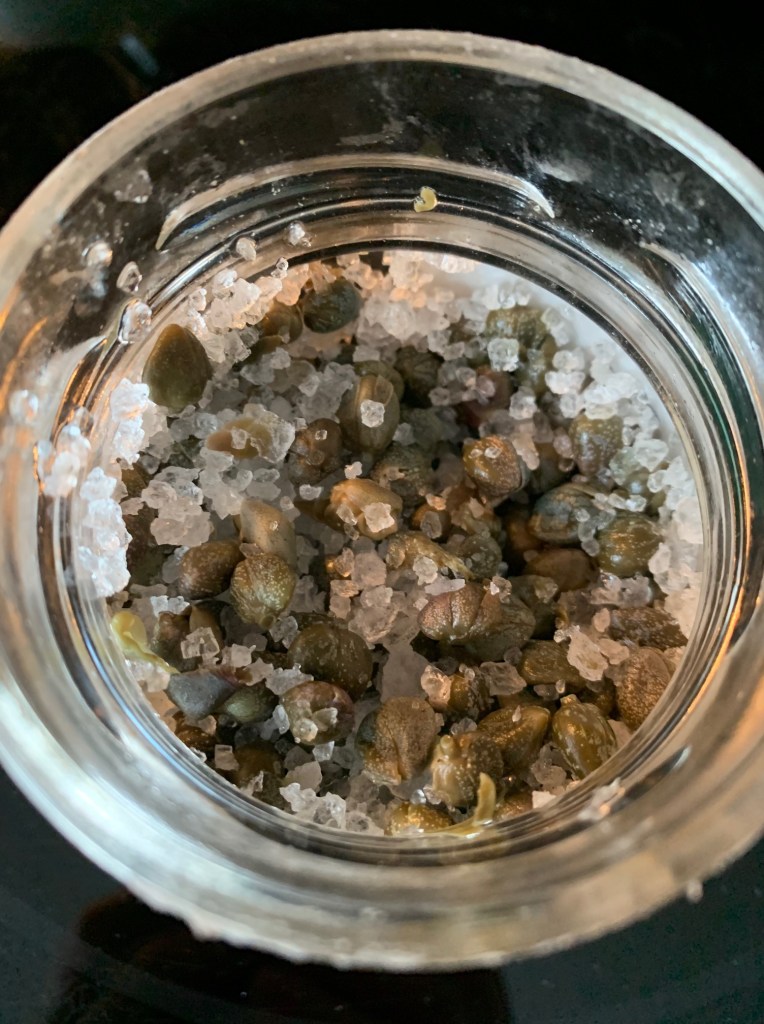
I chop up a handful of green and kalamata olives, half of a large shallot (minced), and a generous tbsp of capers packed in salt.
You need to rinse those capers in a colander under hot water to melt the salt, but once you try this version instead of brined capers, I think you might never go back.
All of these flavours will build and make you totally forget about mayo. Or maybe that’s just me.
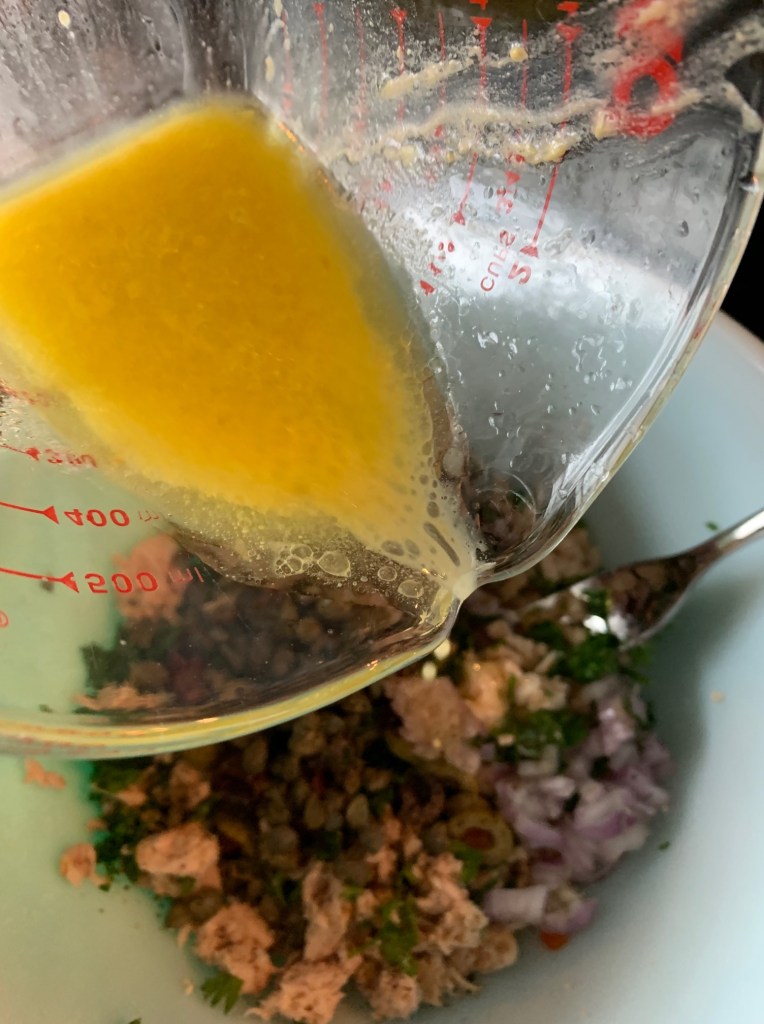
Now to dress the tuna mix. I’m replacing the typical mayo dressing with a lemon (juice of 1), olive oil (1/3 cup), and mustard dressing (2 tbsps)—I like a bold dressing.
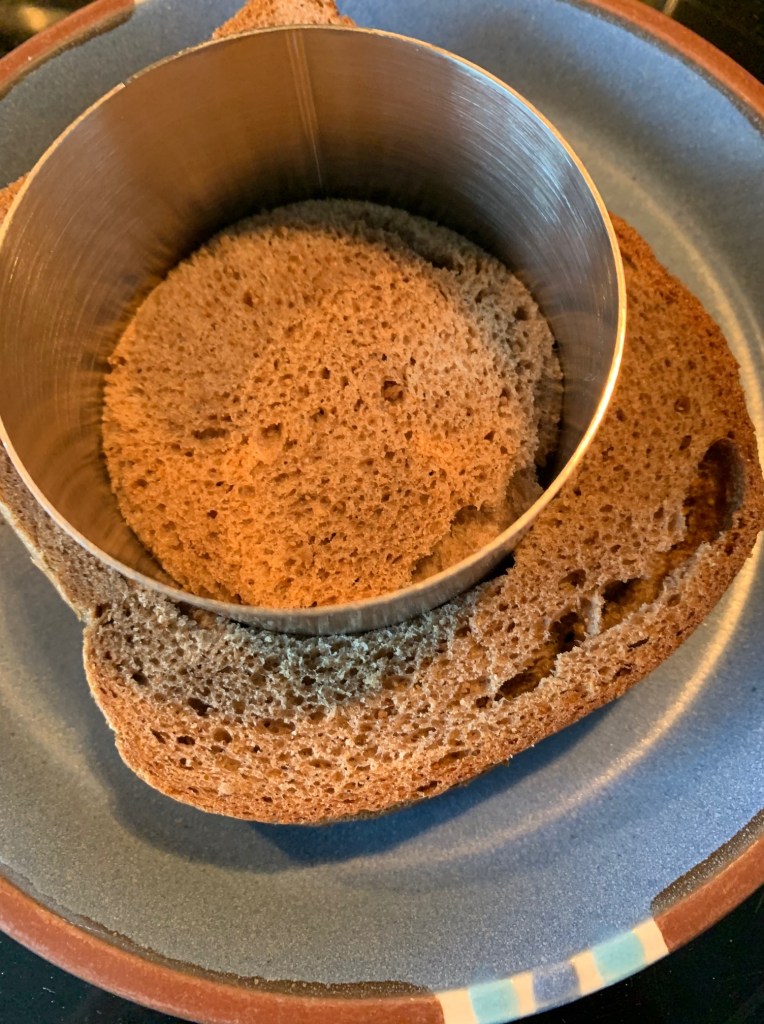
It’s fresh and bold and it’s the perfect pairing for a dark rye bread, smeared with a hint of dijon mustard. I take a metal ring and cut my bread into a circle, because.
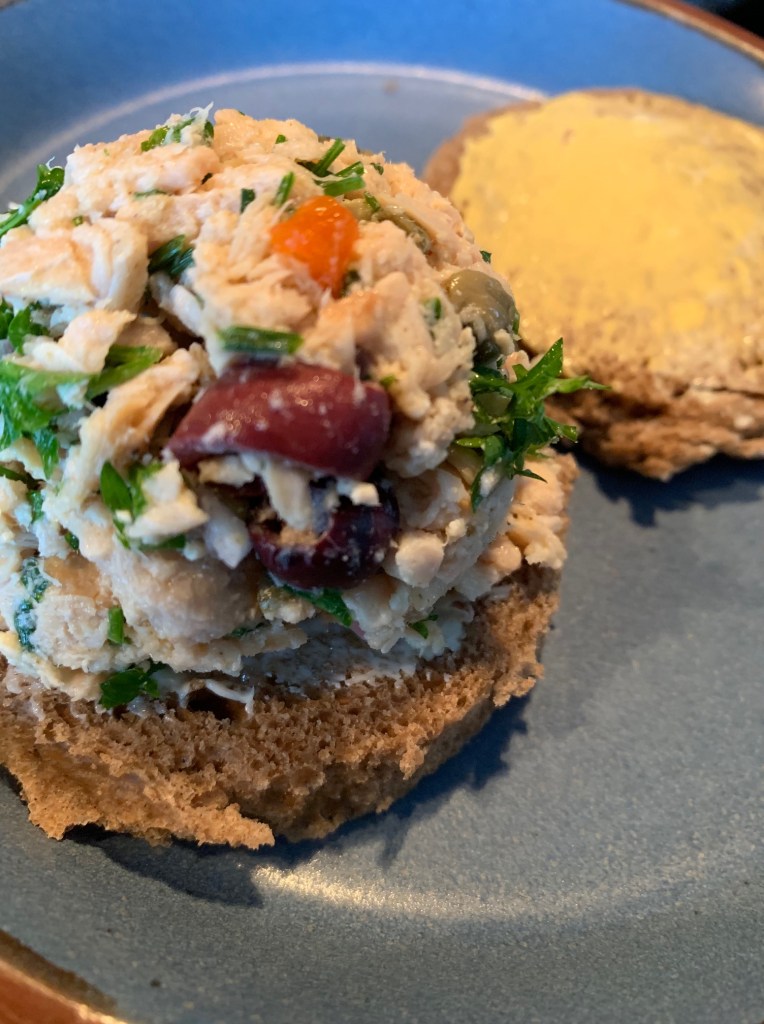
Then I take an ice cream scoop and release the tuna mixture onto my rye circle.
At this point you could easily eat it as an open faced sandwich but I take the lid and push down on it to make a more manageable meal out of it and I’m happy.
I don’t eat sweet breakfasts, so I’m always on the lookout for an easy, filling but savoury solution.
Enter this mildly spiced black bean melt, which was inspired by an episode of Milk Street where they went to Oaxaca and ate Molletes then went back to the test kitchen to make an Americanized version. They swapped the traditional bun with toast and Mexican cheese with mozzarella.
This sandwich draws on the Milk Street approach, but with several variations, because I’m a loose follower of recipe instructions.
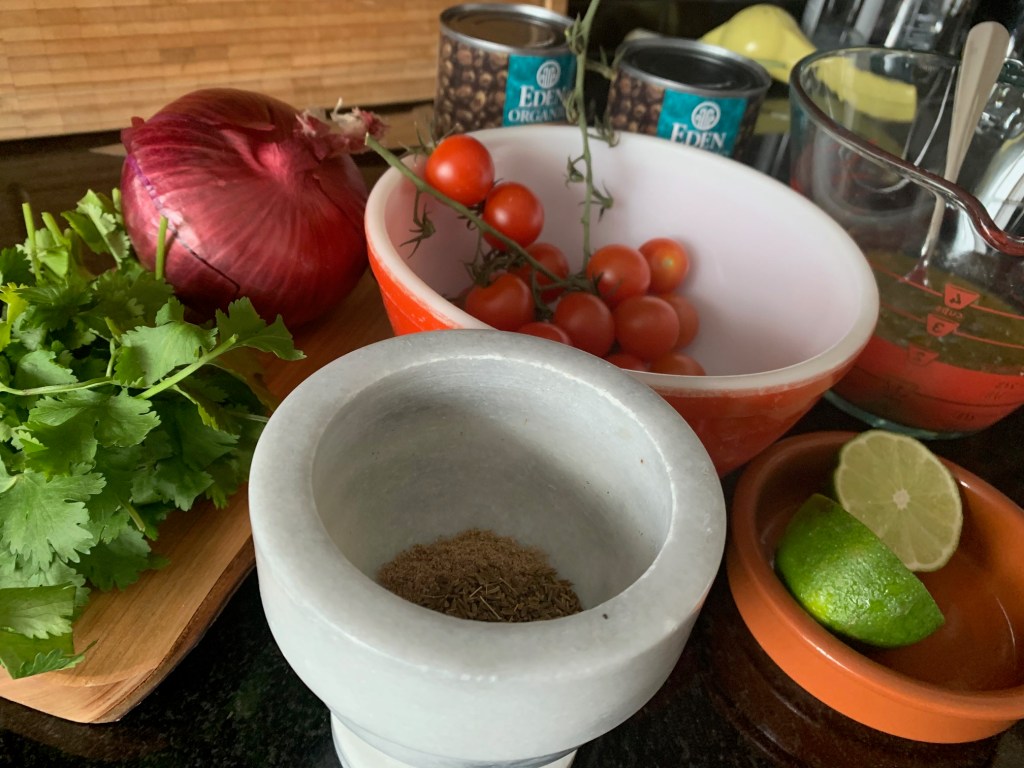
It’s winter in Toronto but these ingredients make me think of warmth and sunshine. I’ve got cherry tomatoes, red onion, cilantro, and lime for the pico de gallo that’s going to top my sandwich. There’s cumin and coriander as well as purchased salsa verde to give heat and interest to the black bean sauce, which will be the base of the sandwich.
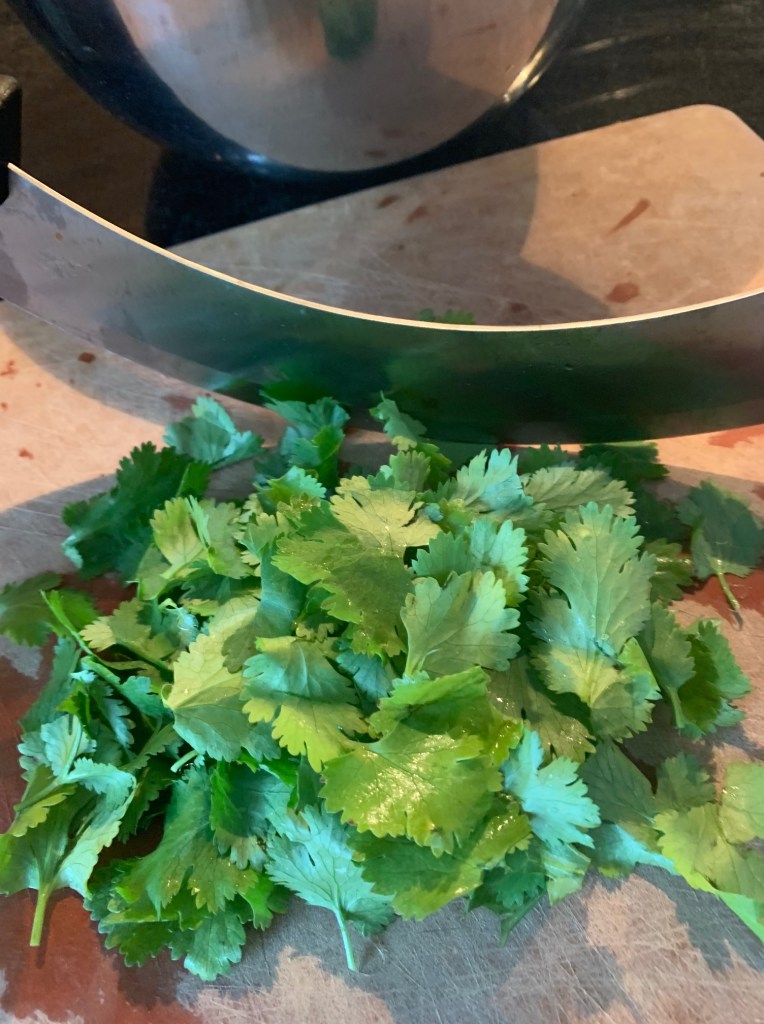
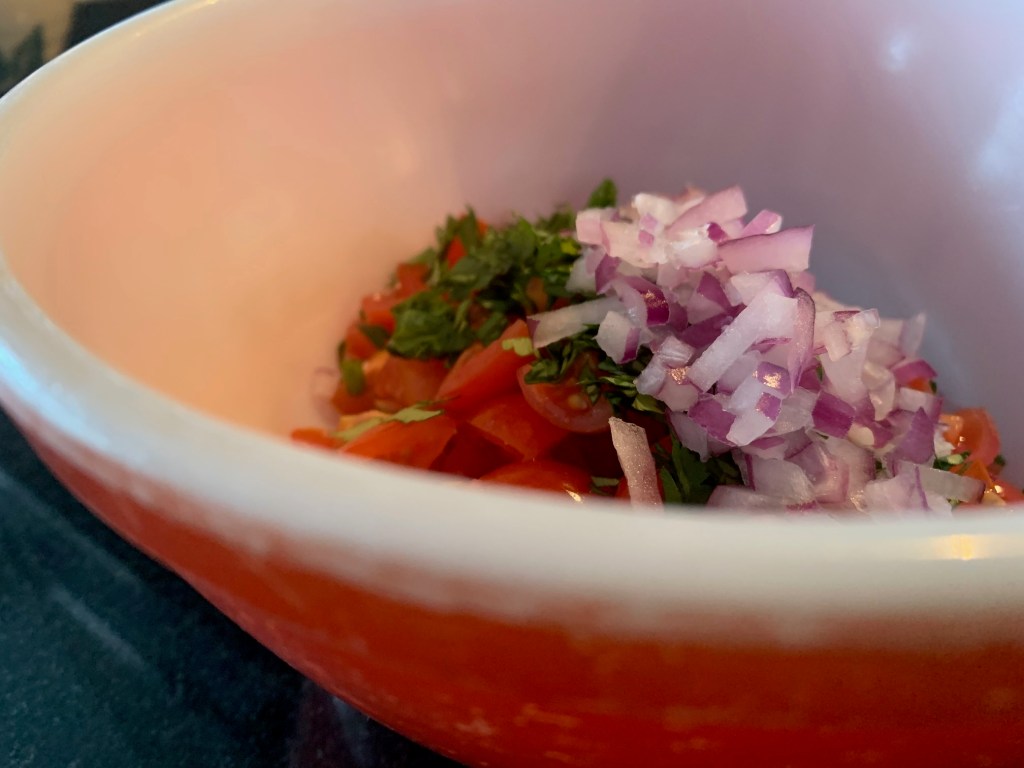
Time to chop about 1/4 cup of cilantro, half of which will go into the pico de gallo, the other half goes into the bean sauce.
I mince one quarter of a red onion. Using a serrated knife, I cut a pint of cherry tomatoes into tiny, uniform pieces (one cherry tomato gets halved then quartered). Add the juice of one lime, toss, and let that thing mellow.
Time to make my black bean spread. I adore beans, but the black bean is among my least favourite. It’s probably been a couple of decades since I’ve played with them. My go-to for refried beans is the pinto bean, but the recipe calls for black beans and so I’m all in.
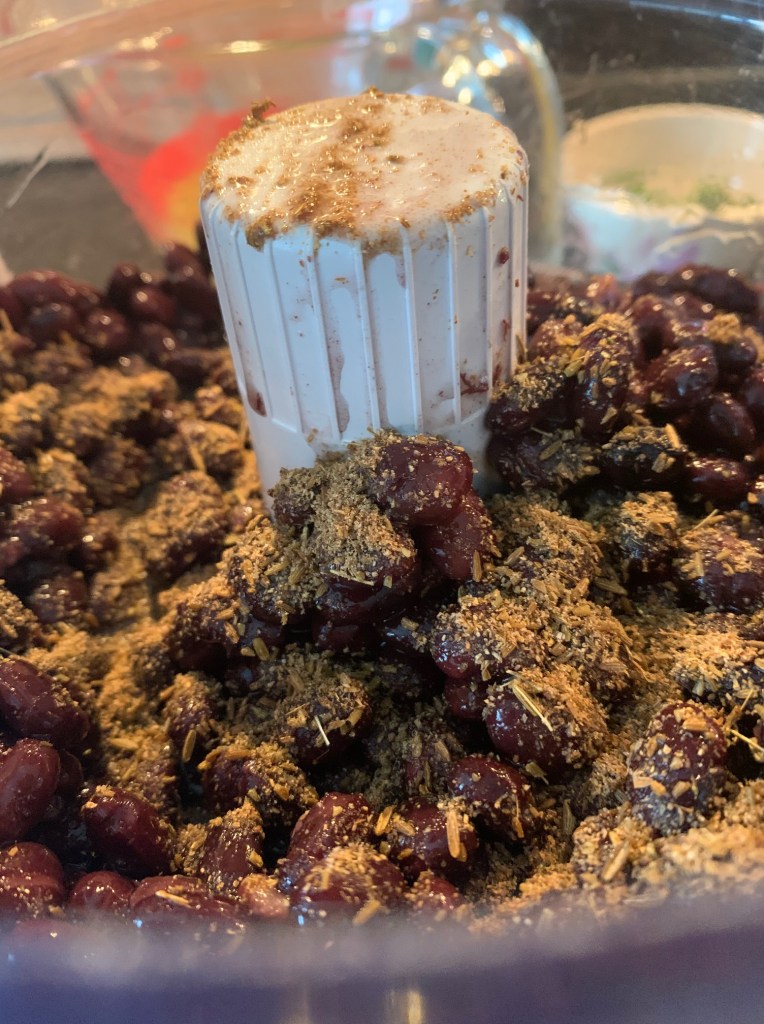
The recipe says I’ll need two cans of black beans and that I should reserve 1/4 cup of the liquid from the cans, and that’s what I do. Into the food processor they go but first, I toast my spices: 1 tbsp cumin seeds (ground in my trusty mortar and pestle) and 1 tbsp ground coriander. It takes less than a minute in a dry fry pan to bring out the warmth of those spices.
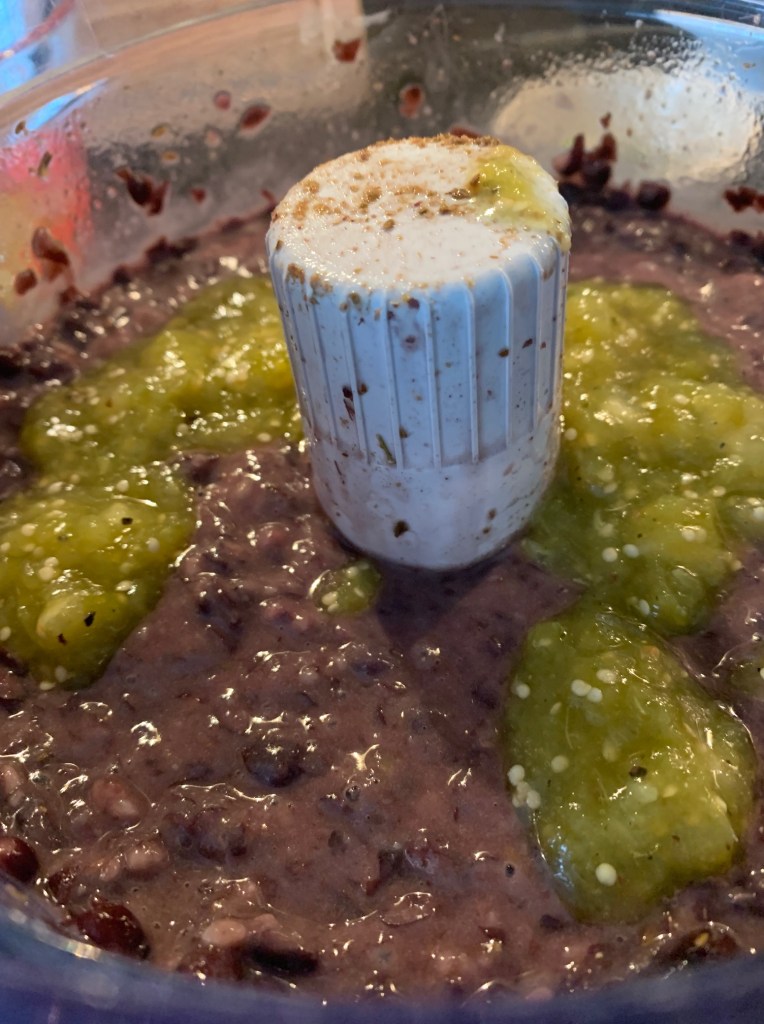
The original recipe calls for adobo sauce and red chiles, but I prefer salsa verde—a blend of tomatillos, green jalapeno, onions, coriander, salt & pepper. Instead of whipping this up from scratch I take a shortcut: I use half a cup of Mad Mexican salsa verde, which is always on hand in my fridge. In that goes to perk up those beans.
Cilantro and the juice of one lime gets added and I give the food processor another whirl. It looks fine but it’s awfully liquidy and now I figure out my error: I added the entire 1/4 cup of bean liquid right away and didn’t account for the extra green salsa, which is super liquidy.
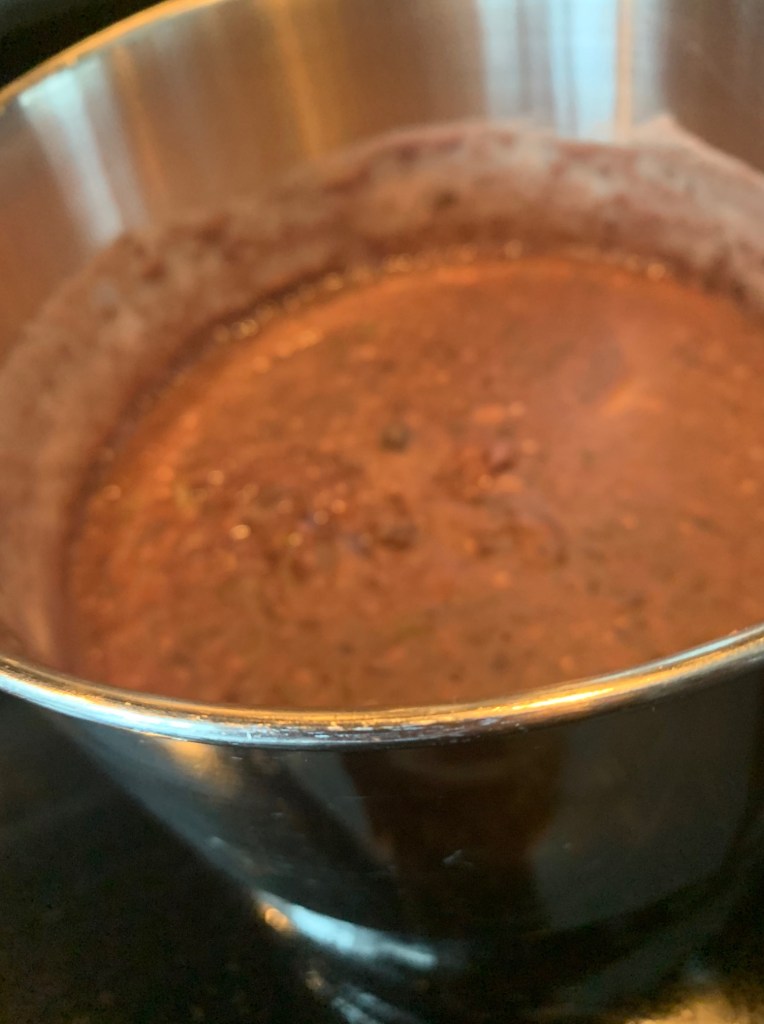
How to fix? I throw the beans into a pot and simmer on the stove on medium low heat for about 20 minutes, stirring on the regular. It does the trick.
I’m kind of glad that I made this mistake, because simmering that bean sauce really deepened the spicy flavours, so I’m going to call that a lucky win.
The original version of this sandwich involves Mexican cheese but Milk Street swapped it for a melty mozzarella. I’ve got fontina in the fridge and decide that’s melty enough, so I shred about a half a cup of fontina.
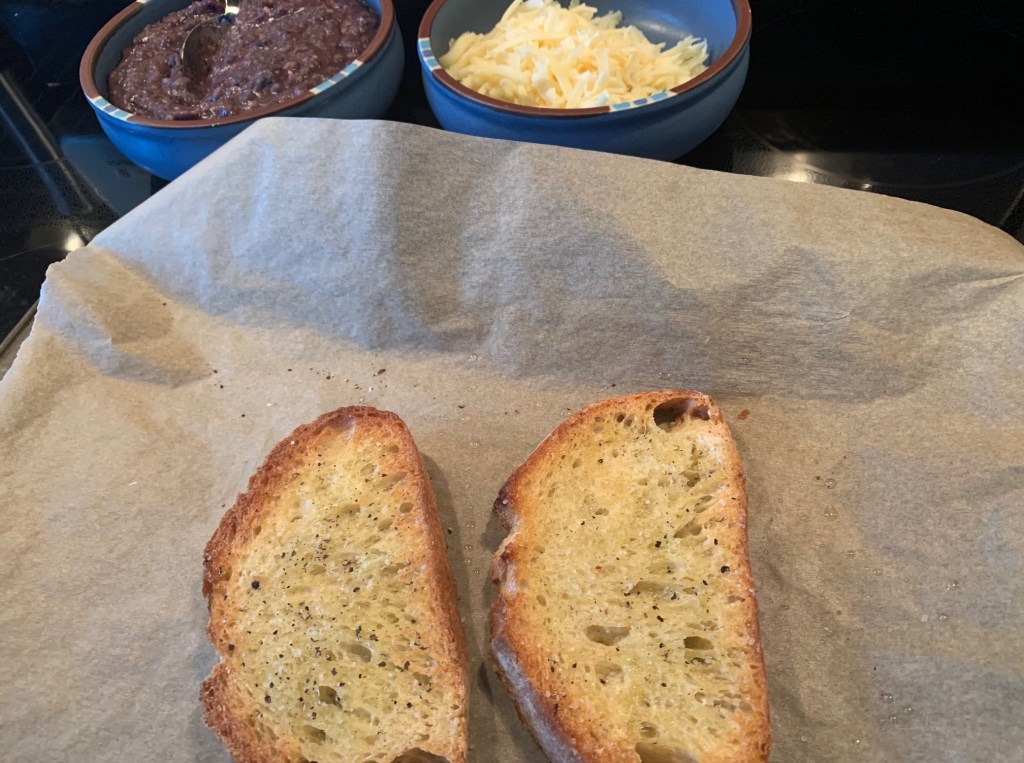
Because I’m doing this sandwich blog as a hobby, my freezer suddenly looks like I’ve become a bread hoarder: I’m keeping about 8 different breads in there to pair with whatever sandwich of the week I decide to build. Today, I’m grateful to have a sturdy, crusty Italian loaf sliced at 1/4″. It’ll be a good base for this sandwich.
Parchment paper goes onto a baking tray. Frozen bread gets brushed with olive oil on both sides, seasoned with salt & pepper, then broiled on both sides to make it nice and crunchy. You need a base that can take the weight of what’s to come.
What’s prettier than golden toast fresh out of the oven? OK, plenty, but this duo looks fetching.
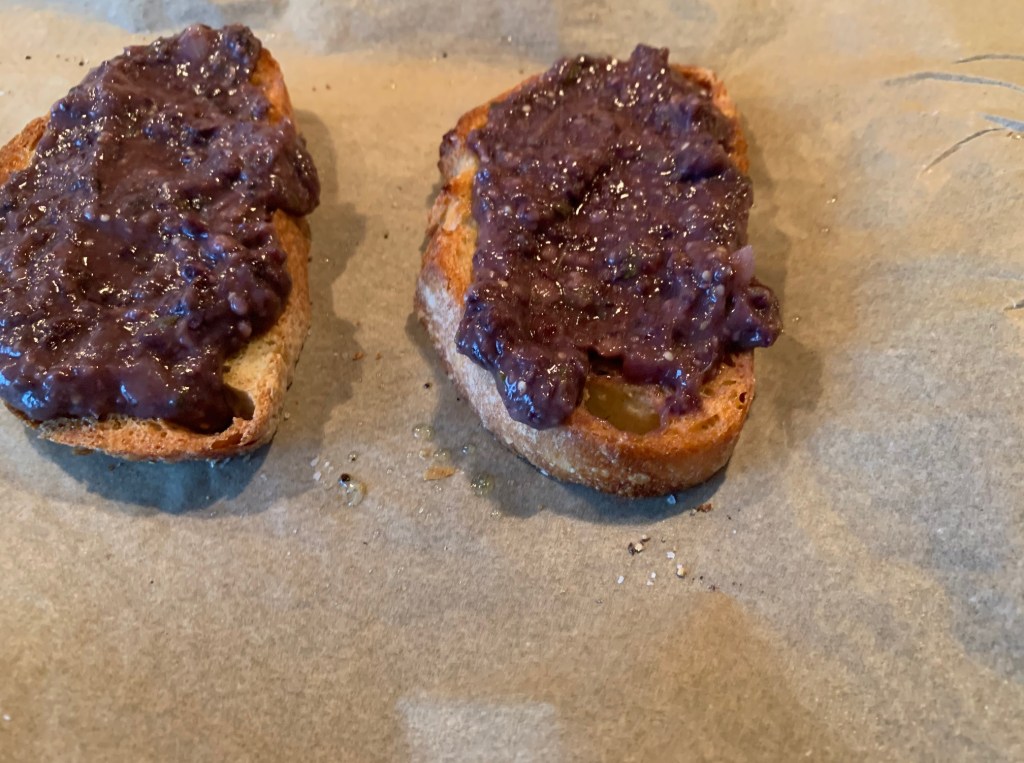
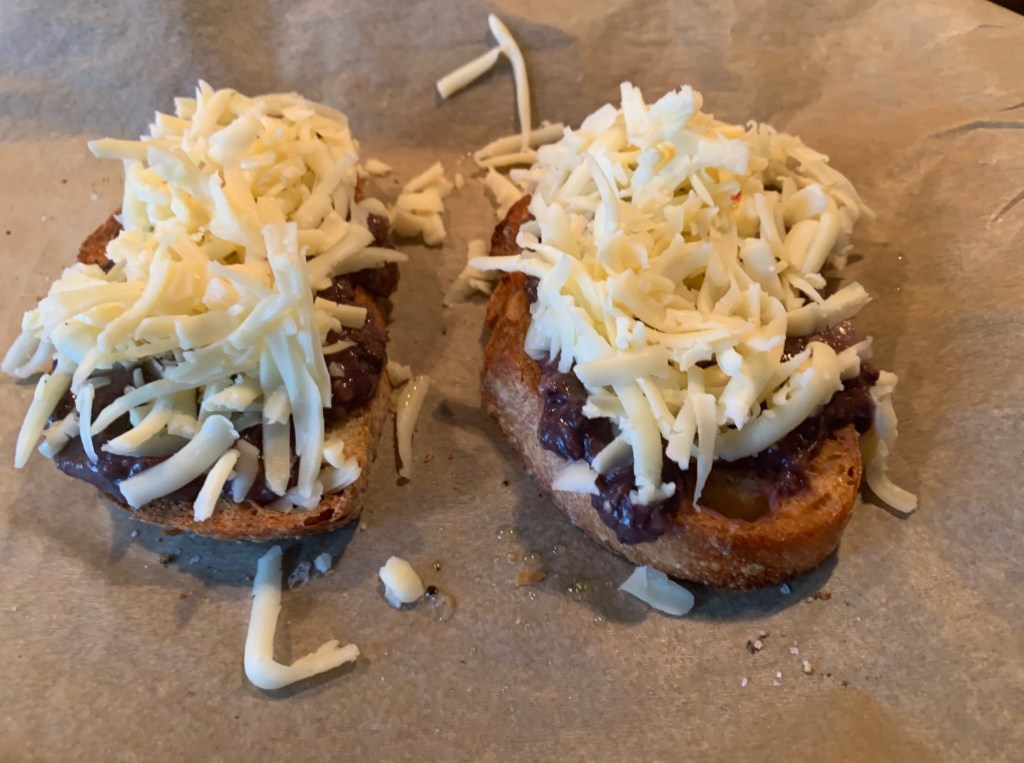
Time to build the sandwich. I’ve got my trio of toppings at the ready: black bean sauce, shredded fontina cheese, pico de gallo.
Black beans go down and I’m happy with the consistency of the spread.
Top that with cheese.
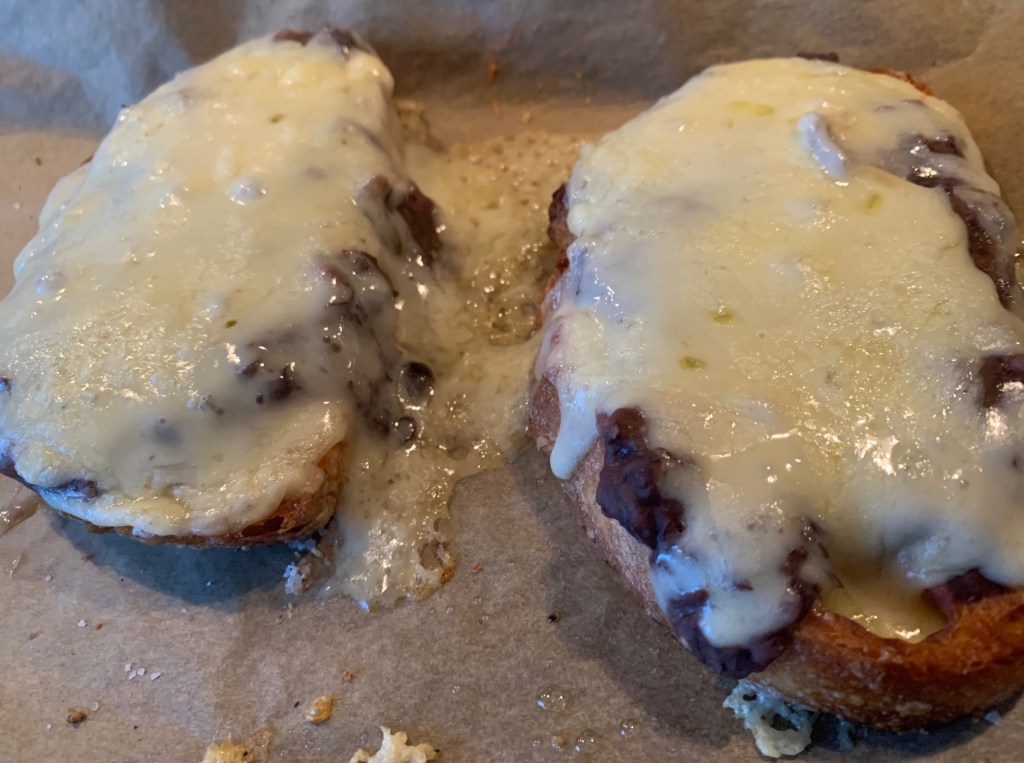
Under the broiler it goes, watching carefully so it doesn’t burn. And they’re done.
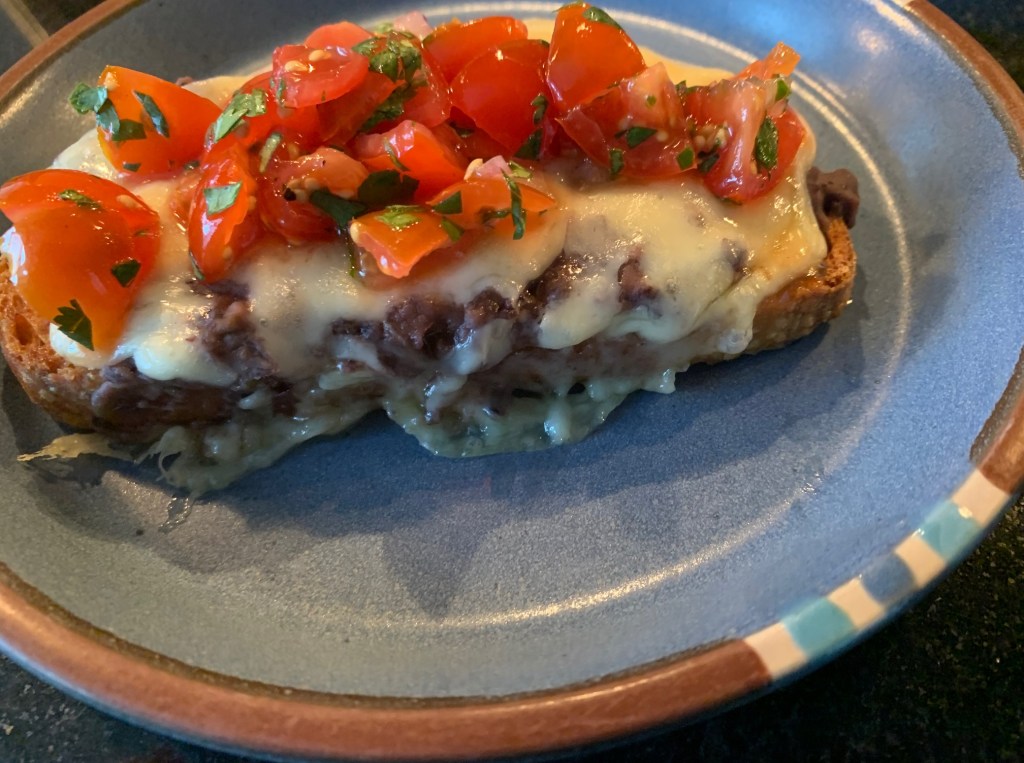
Look at that melty goodness. Now for the final touch: spoon on the cool pico de gallo for a fresh, lively contrast and then dig in.
This sandwich has moved black beans up the pecking order. It’s got warmth, richness, and tartness. As a handheld, it’s a messy sandwich but oh so worth it.
I’ve got about a cup of black bean sauce leftover in the fridge which could be a workhorse for quesadillas, burritos, or nachos but I guarantee you, they’re destined to become another toasty bean melt—that sandwich is just that delicious.
You know that chicken recipe that’s so good they call it ‘marry me chicken’? I think I’ve found the breakfast croissant equivalent.
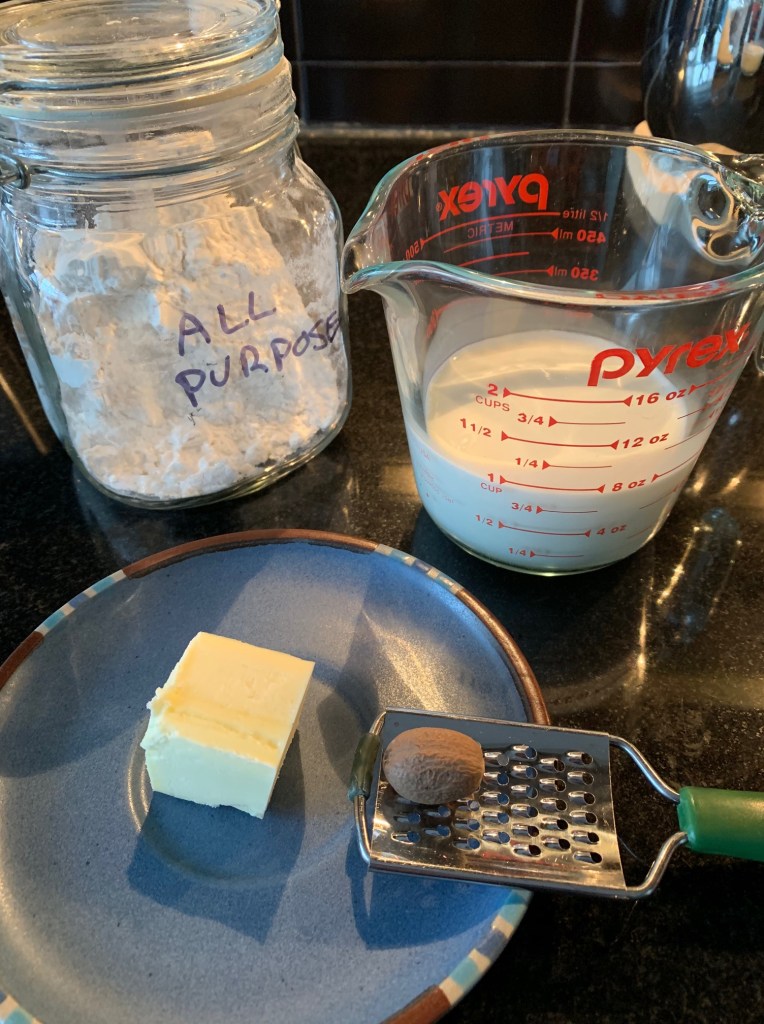
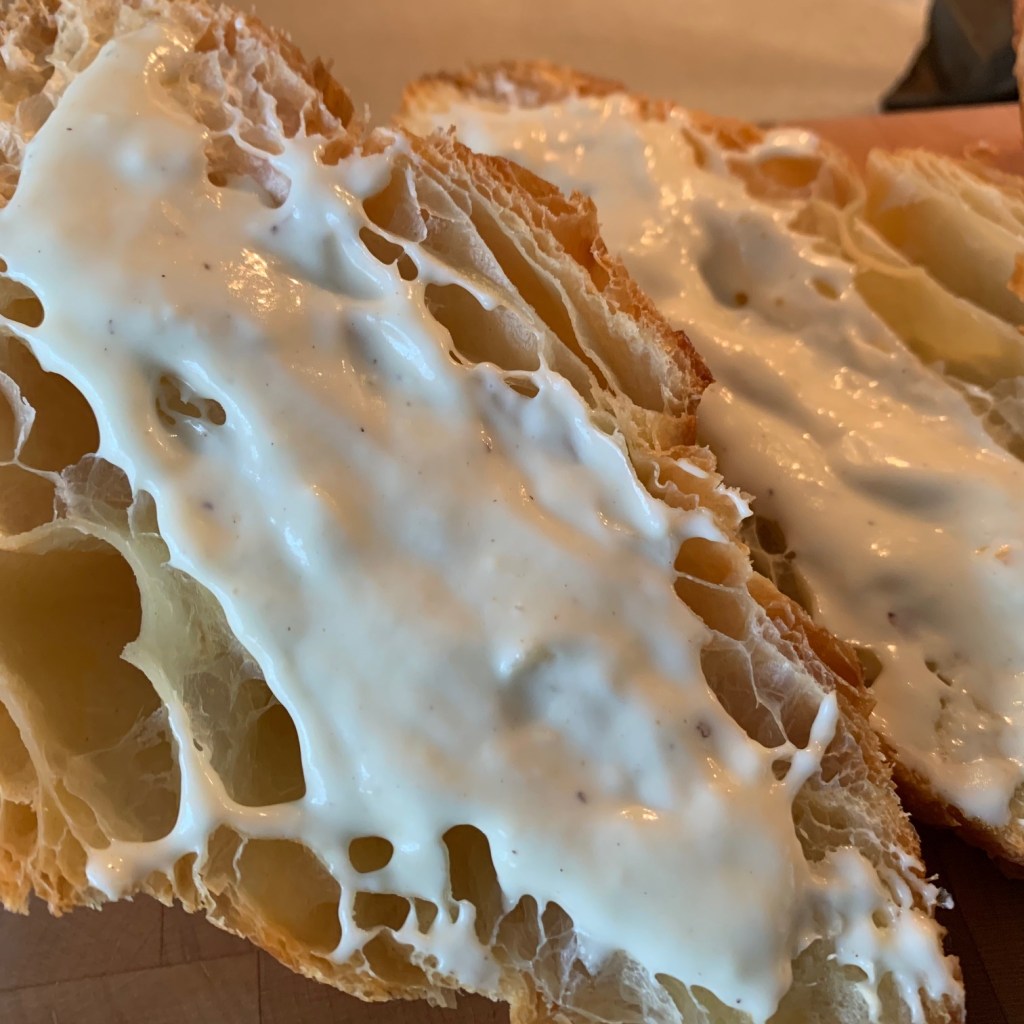
It starts with fabulous croissants that I got from my local patisserie but, honestly, the sum of this sandwich is so luxurious even regular grocery store croissants will do. Because we’re going to make a bechamel sauce that is going to turn these croissants into a silky, sensuous hot mess.
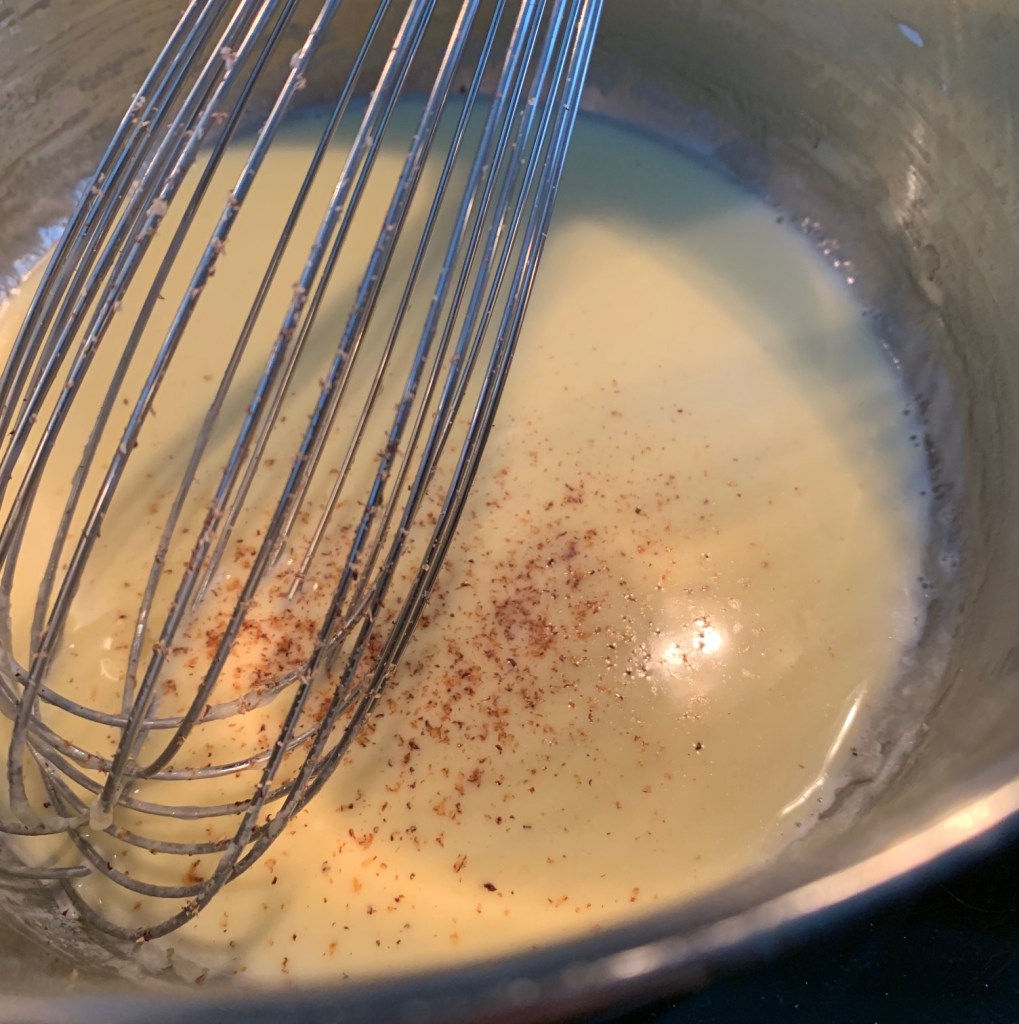
Here’s my mise en place for the bechamel: equal parts butter and flour to make my roux, which is the base for any cream sauce (about 2 tbsp), 3/4 cup cream (I always pour a little more into the measuring cup and eyeball it once I’m incorporating the cream into the roux), and about 1/8 tsp freshly grated nutmeg.
You might think you don’t like nutmeg, but before you make your final judgment, please try buying whole nutmeg and freshly grating it—you’ll never buy store bought nutmeg powder again, I promise.
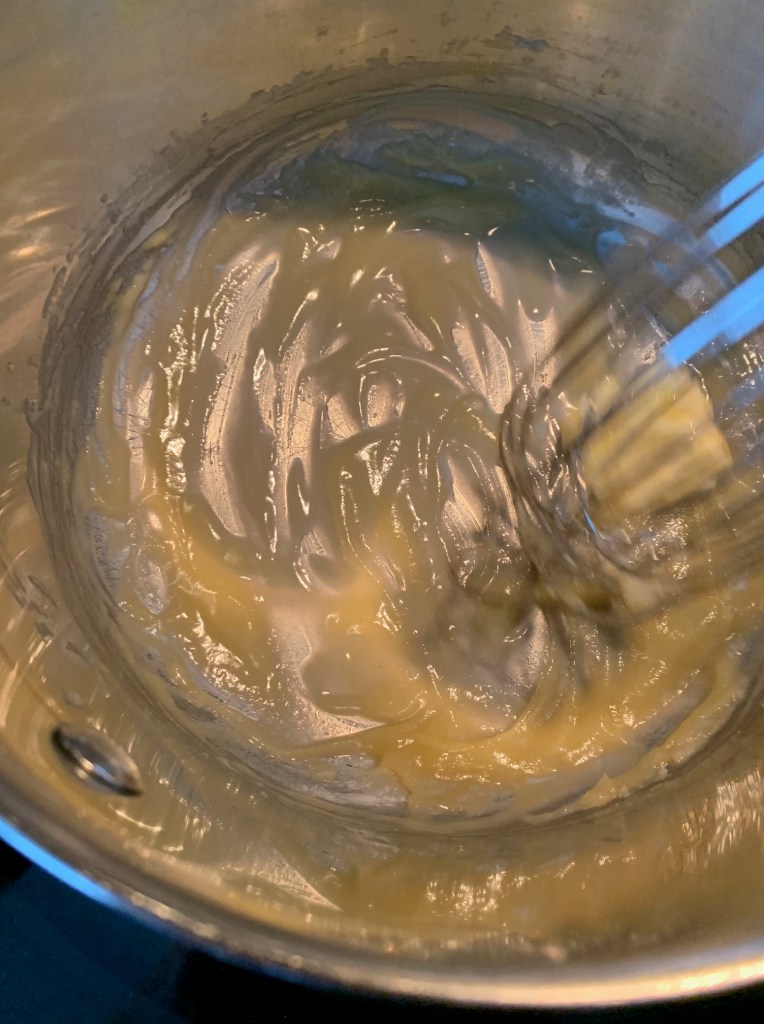
I’m ready to get the roux started, so I melt the butter in a saucepan at medium-low heat then whisk in the flour.
This is the base of the sauce and will help thicken it as well as add a bit of glossiness. It’s ready for the cream, so keep the whisk going.
The whisk is doing its magic and the sauce is beginning to thicken, so in goes the nutmeg.
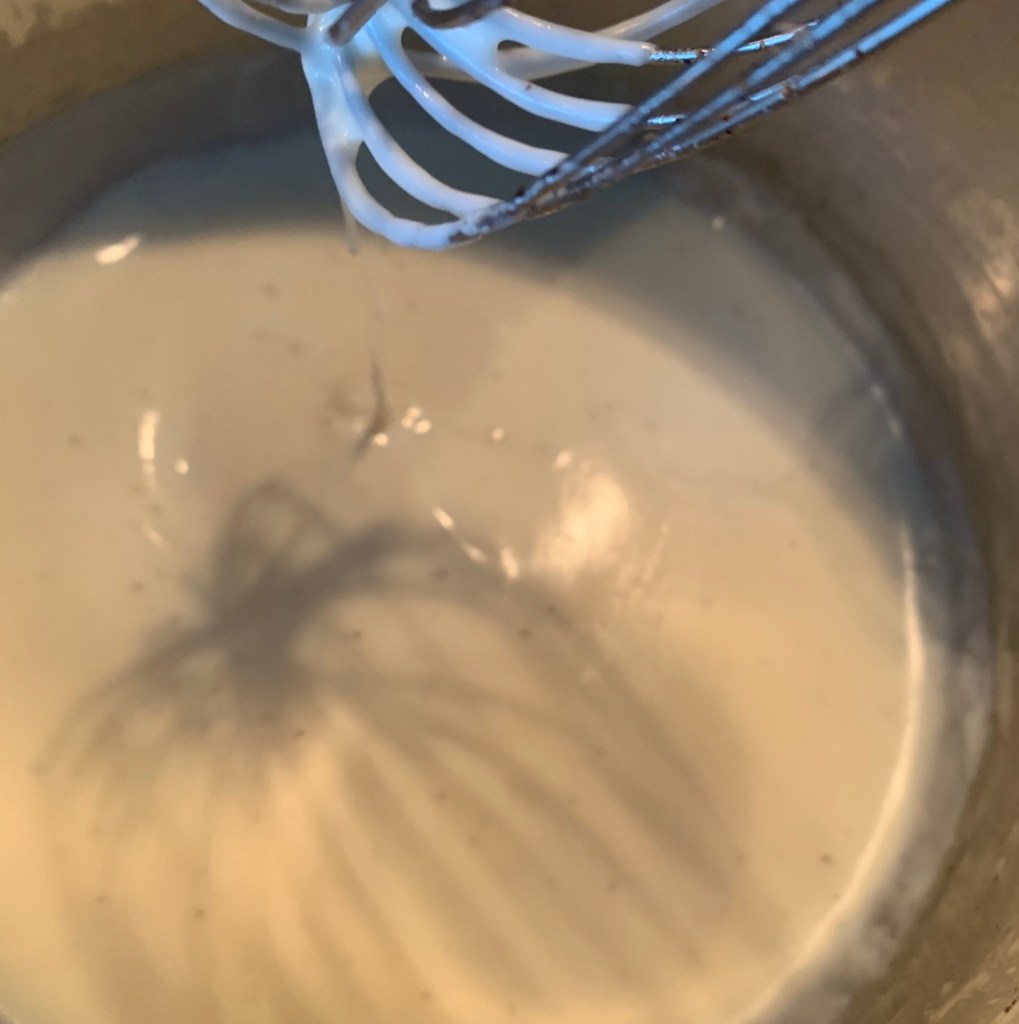
And I keep whisking until the sauce is creamy enough to become a sandwich spread. It’s ready.
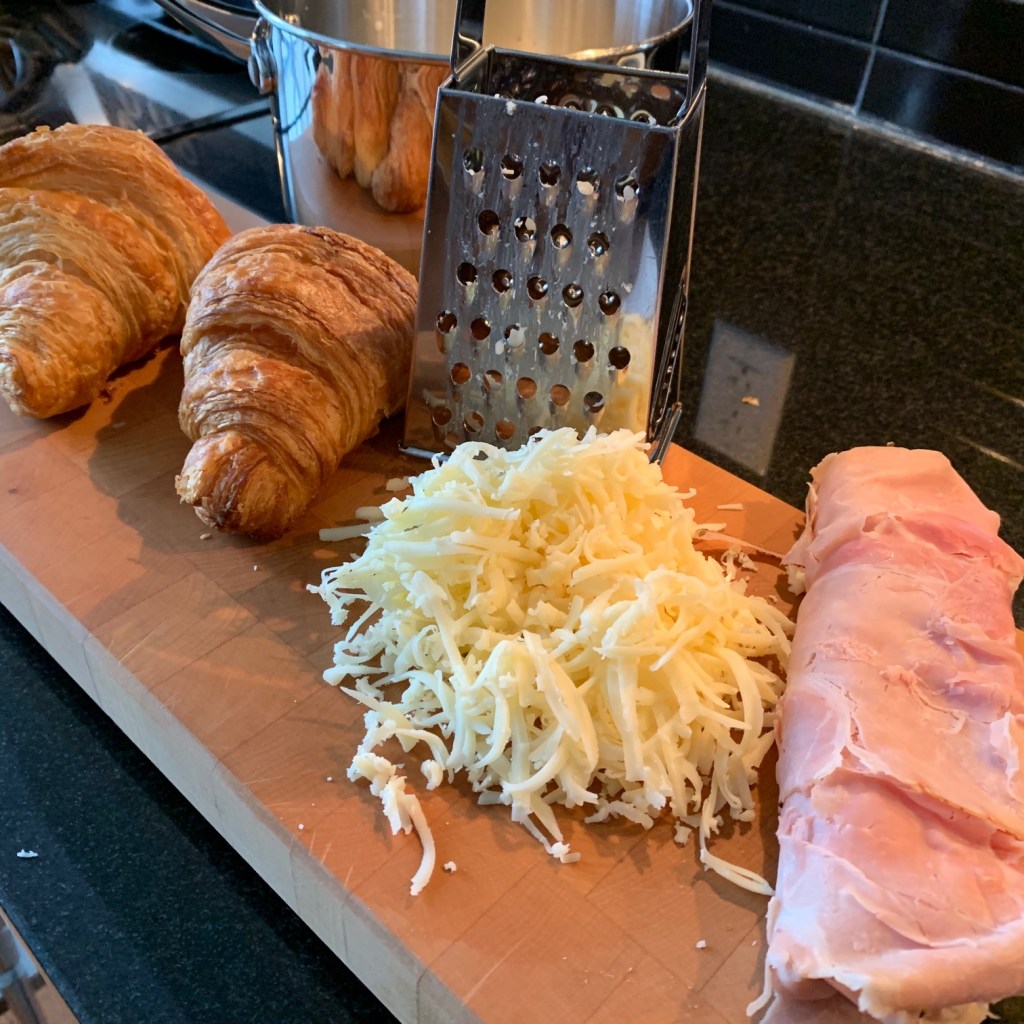
Magical transformation. OK, time to get my sandwich mise en place going.
I’ve got two gorgeous croissants that could be the star all on their own. There’s about a half a cup of grated Norwegian Jarlsberg cheese (you could substitute with gruyere, swiss, even cheddar). And some nice Italian ham. Ready to build my croissant sandwich.
Slice open those croissants and give both sides of the sandwich a generous dose of that bechamel spread. Place the ham on the bottom half of the croissant.
Now for a generous helping of cheese.
Crack some black pepper, close your sandwiches and place them on a baking tray that’s lined with parchment paper.
These go into a 350 F oven for 10-15 minutes—until the cheese is melty and the outside of the croissants are crispy and golden brown. Ah, here we go …
That is one sensuous sandwich: the creaminess of the bechamel melds with the nuttiness of the melted cheese, the salty, sweet ham stands out, and that buttery, flaky croissant just puts it over the top.
This ain’t no diet sandwich, but if I’m making brunch for a crowd this is my go-to breakfast sandwich. You can make them in advance and quickly reheat once you’re ready to serve brunch. For the vegetarians, I swap out the ham for sliced tomatoes but you could also do a spinach/feta mixture.
I’m making 52 sandwiches this year and trying to decide which ones make the top 10 list. This croissant sandwich is surely a contender for best breakfast sandwich of the year, but I’ve got more breakfast sandwiches to test, so the challenge is on.
In our house we make pizza from scratch on the regular, but sometimes I want the satisfaction of pizza without the fuss.
Usually that means delivery, but why get inferior pizza when a superior pizza sub can be made faster than it takes for the delivery guy to show up? Especially since we’re still working through the leftovers of my last trip to Eataly.
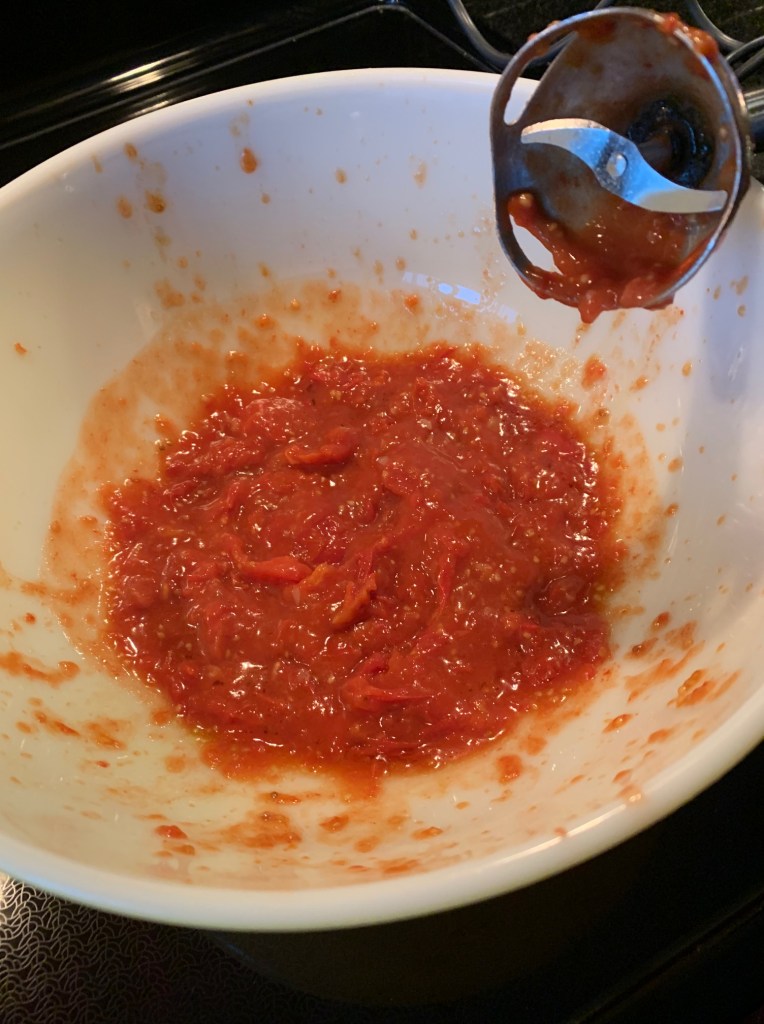
All that’s missing is the tomato sauce. Easy enough. I put a pint of cherry tomatoes on a pyrex pie plate and drizzle them with a hint of olive oil and balsamic vinegar. Season with salt and pepper. In the middle of the pyrex plate, I place a whole garlic bulb, top sliced off to expose the cloves, drizzle that with olive oil and salt, then wrap it in foil.
That goes in the oven at 350 F for 40 minutes. I let everything cool down, whip out my hand blender, and it’s time to blitz the tomatoes, 1 tbsp tomato paste, and two cloves of roasted garlic.
This is my go-to homemade pizza or pasta sauce. It can be made with cherry tomatoes or plum tomatoes. It’s usually a Sunday roasting chore that pays off throughout the week for me.
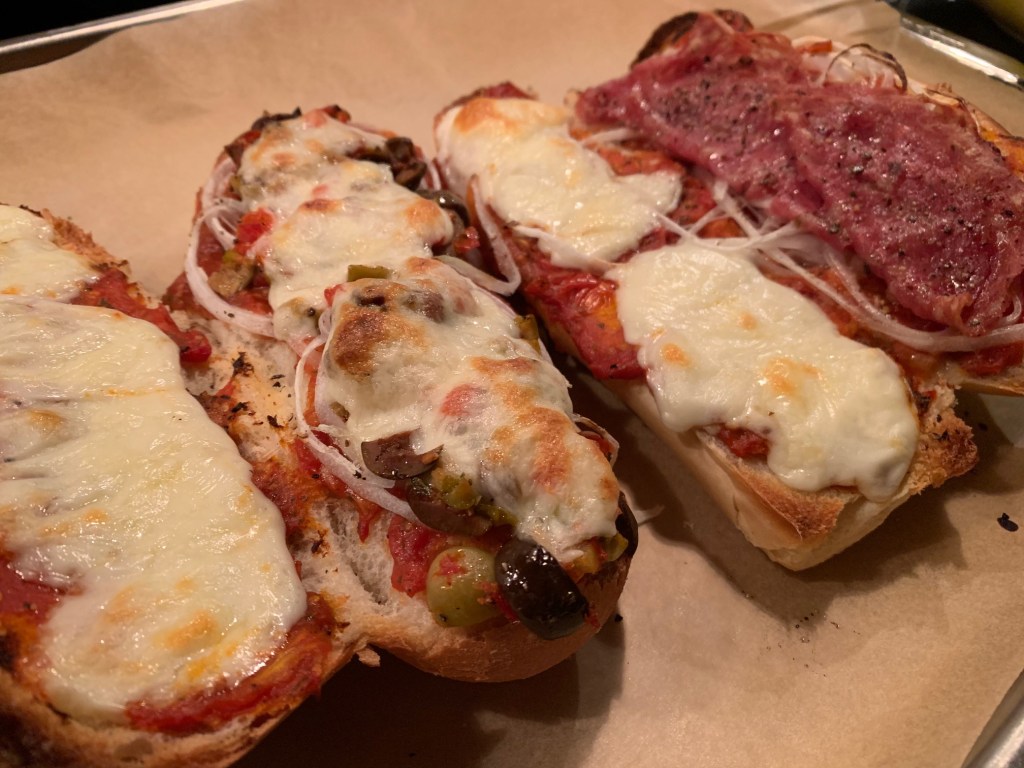
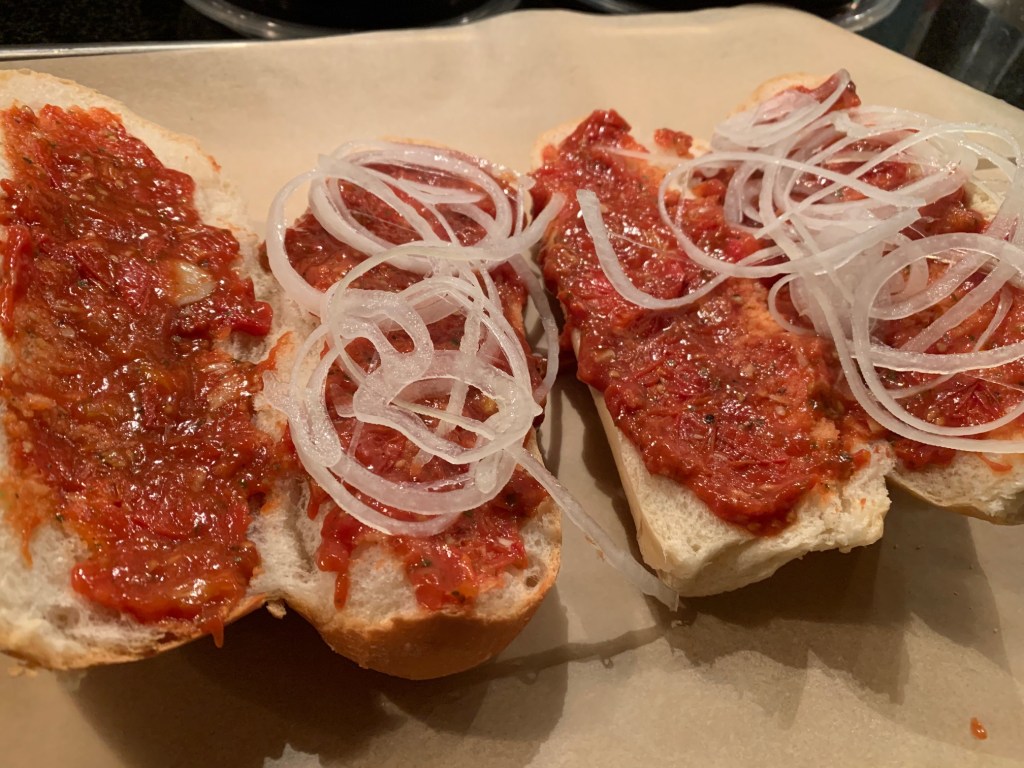
The rest of the job now is simply building my pizza sub then letting the oven do its magic. I cut open two hoagie buns. They’re the base for my subs. Then I smear the pizza sauce on all four open buns and add my thinly shredded onions.
I want a meat sub and a veggie sub, so on the bottom of sub #1, I lay down a salad of olives and sundried tomatoes (I used this salad in my Italian hoagie last week, so this is a great way to use up the leftovers). On the bottom of sub #2, I make the leftover salami from my Italian hoagie the star of this pizza sub.
Everything gets topped with the leftover scamorza cheese, roughly torn in pieces. The olive sub gets extra cheese because I don’t want the olive salad to dry out but I’m OK with the salami crisping up a bit.
Into a 400 F oven she goes, for 10 minutes (babysit it). Everything’s looking good except I want a bit of browning on my cheese, so I blast the top with a quick broil (watch that like a hawk). Pull it out of the oven, admire your handiwork for a few seconds, then let the top and bottom of your buns reunite with their bottom half for a marriage made in heaven.
Crispy bun, hot homemade tomato sauce, the sharp contrast of salami, olives, onions. It’s a match made in heaven. And that melty cheese? Divine. The difference between my Italian hoagie and my pizza subs—veggie and salami—couldn’t be more stark. It’s the pizza sub that stands out.
I rarely eat cold cuts, but when I think about the hall of fame of sandwiches, some form of cold meat sub, hoagie, muffluetta, or hero sandwich comes to mind.
And since Superbowl is around the corner, I’m thinking a made-in-advance cold cut sandwich on an Italian bun makes eminent sense.
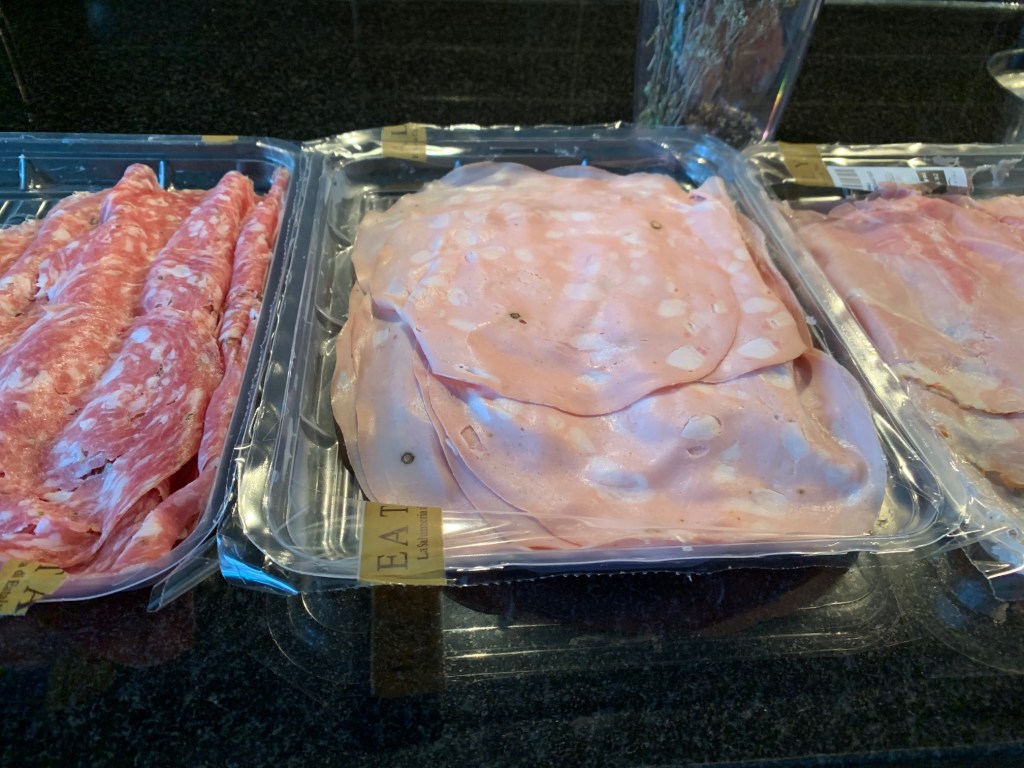
So you know what this means: a special trip to Eataly, a food emporium devoted to all things Italian, which just opened up in Toronto’s Manulife Centre. It’s a mashup of pizza, pasta, and seafood restaurants nestled around a gigantic grocery store that wows with walls of parmesan wheels, cheeses, mushrooms, fresh pasta, and Italian meats.
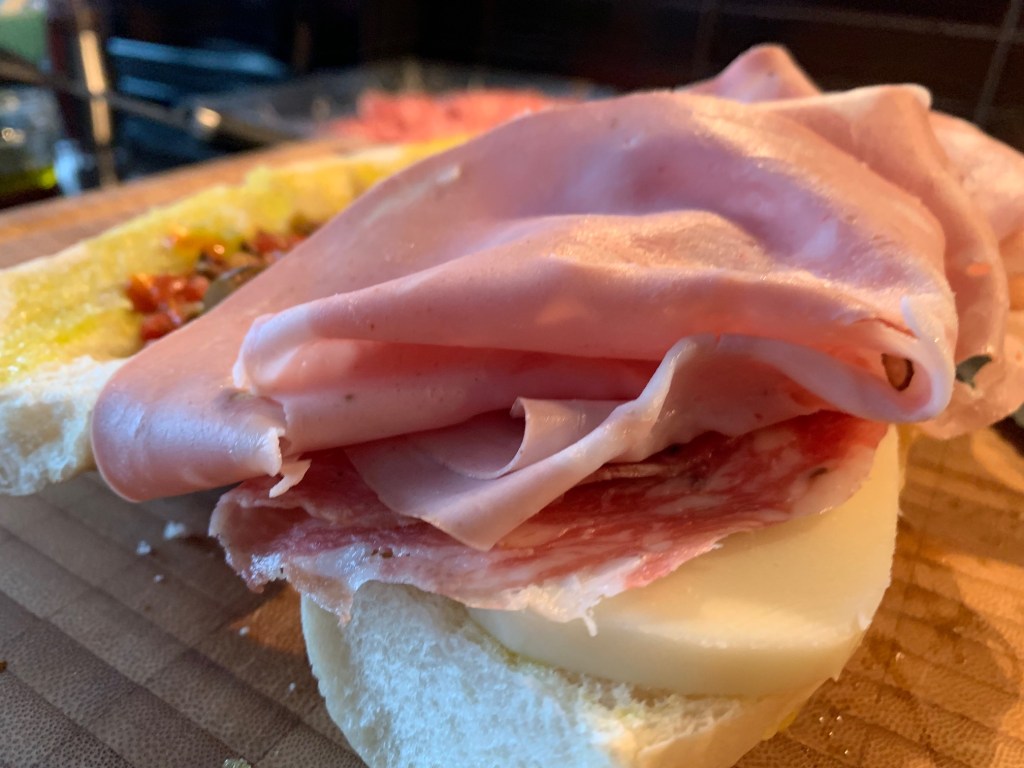
I decide on my cold cuts, sliced paper thin: fennel salami, Tuscan ham, and something I’ve never eaten before, mortadella (the Italian queen of bolognas).
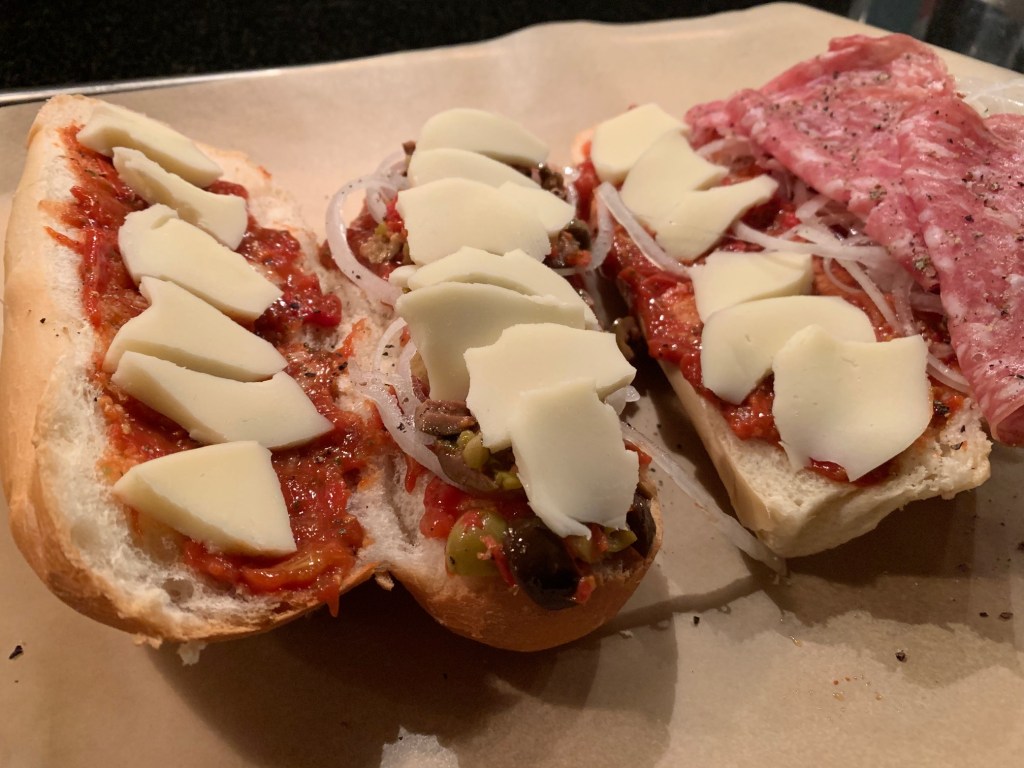
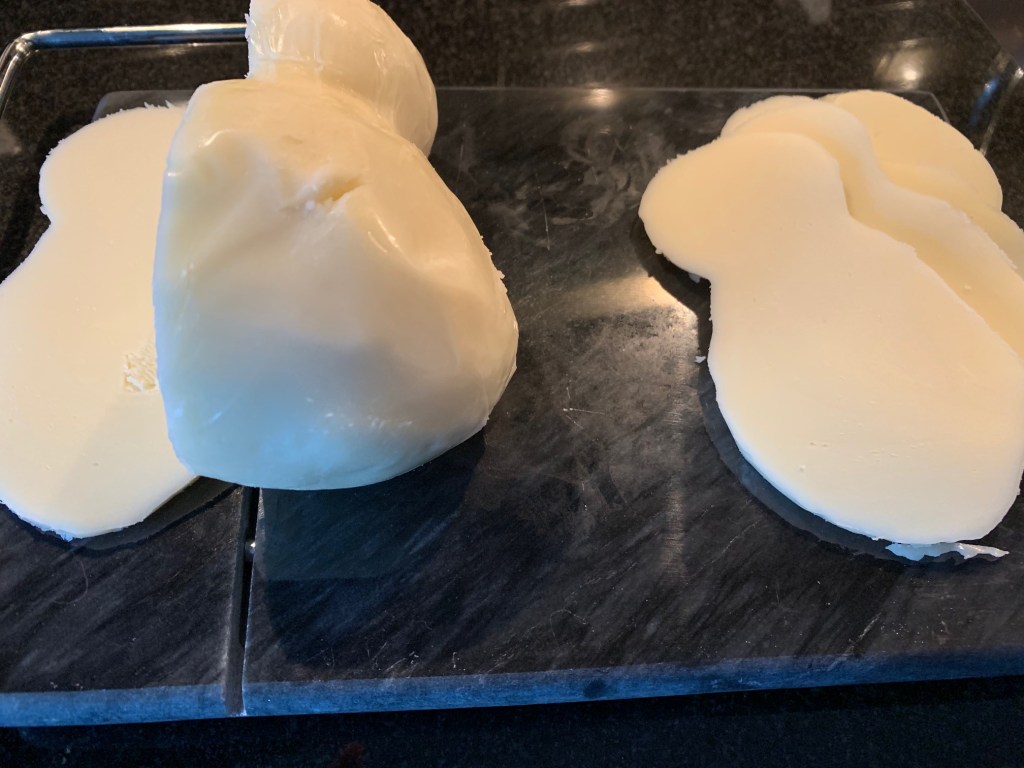
I’m going to need a good quality cheese to go on my Italian hoagie and so I go for Scamorza, a cousin to mozzarella. The one sold at Eataly is made in Canada and has this slogan on the packaging: anything mozza can do, Scamorza can do better. We shall see.
It goes onto the cheese slicer.
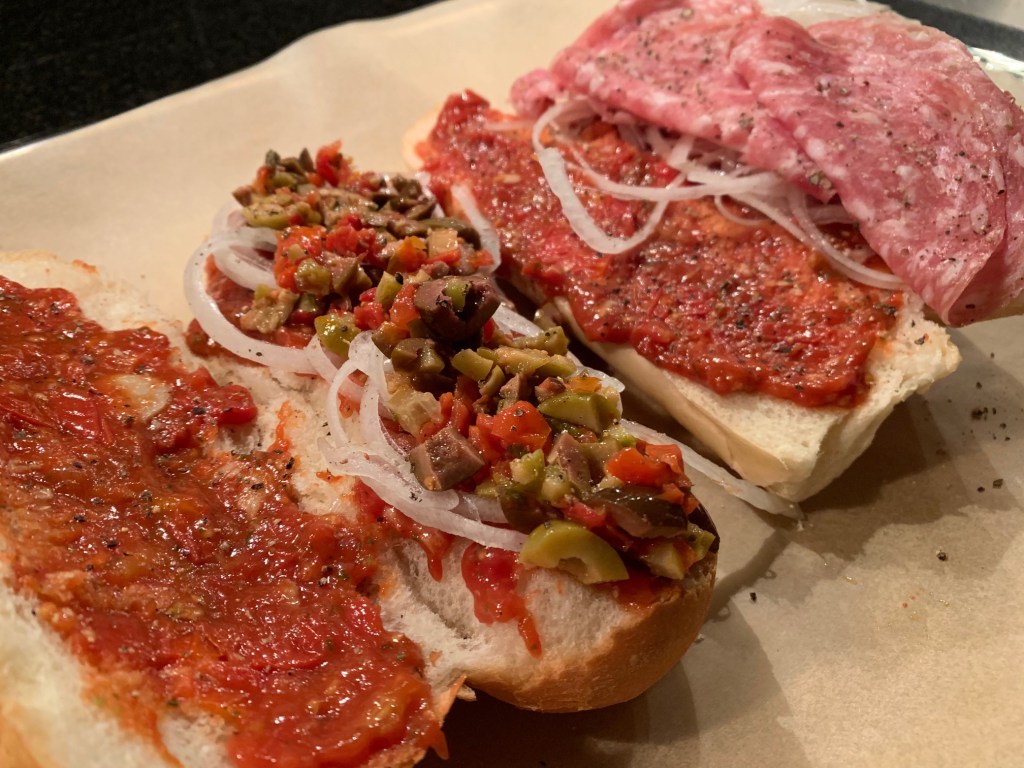
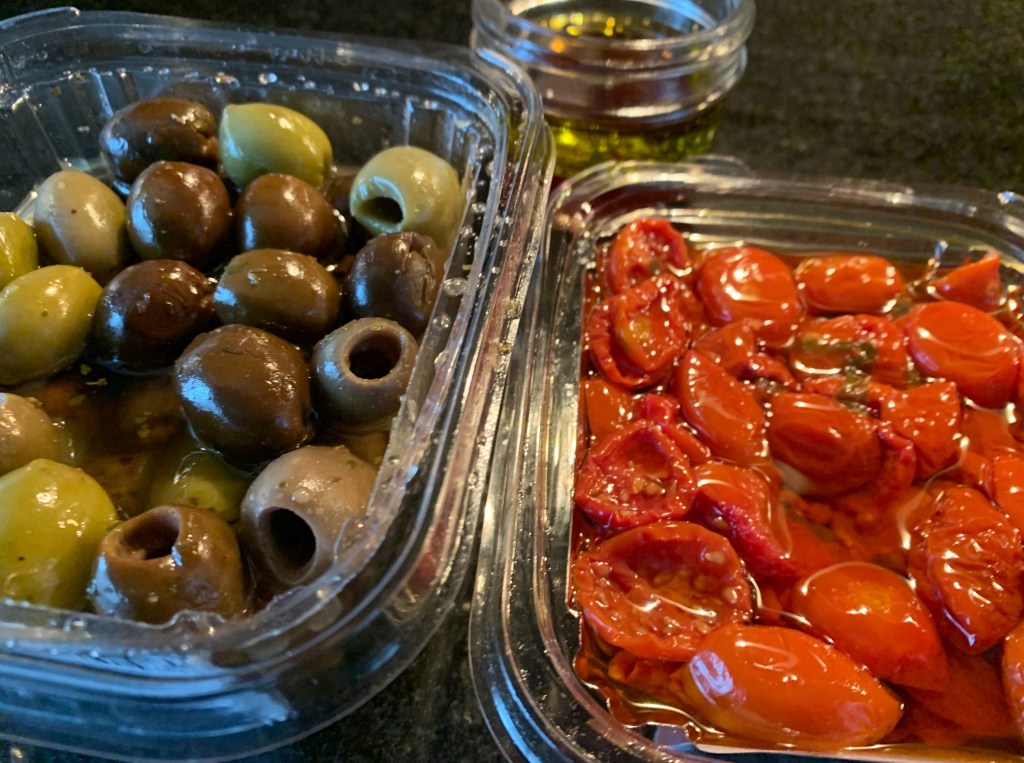
Giardiniera, which is pickled veggies like cauliflower, carrot, and cucumber, is typically incorporated into Italian cold cut sandwiches to add a tart contrast. I love to make Giardiniera but I don’t have anything on hand and, besides, Eataly inspired me in a different direction.
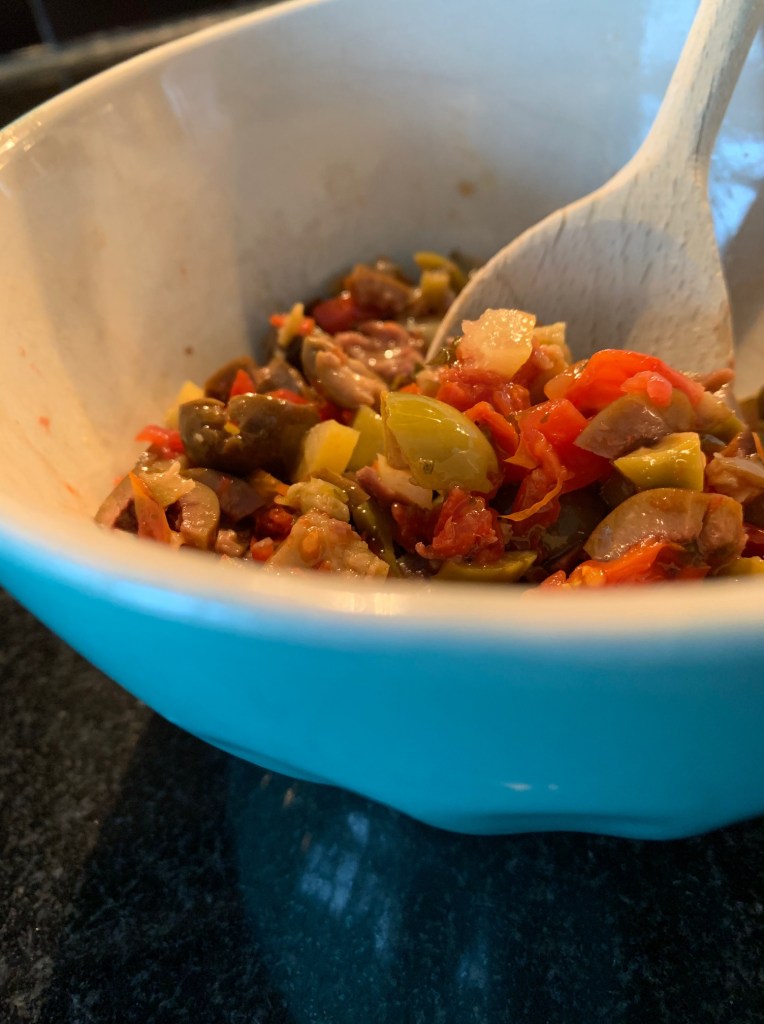
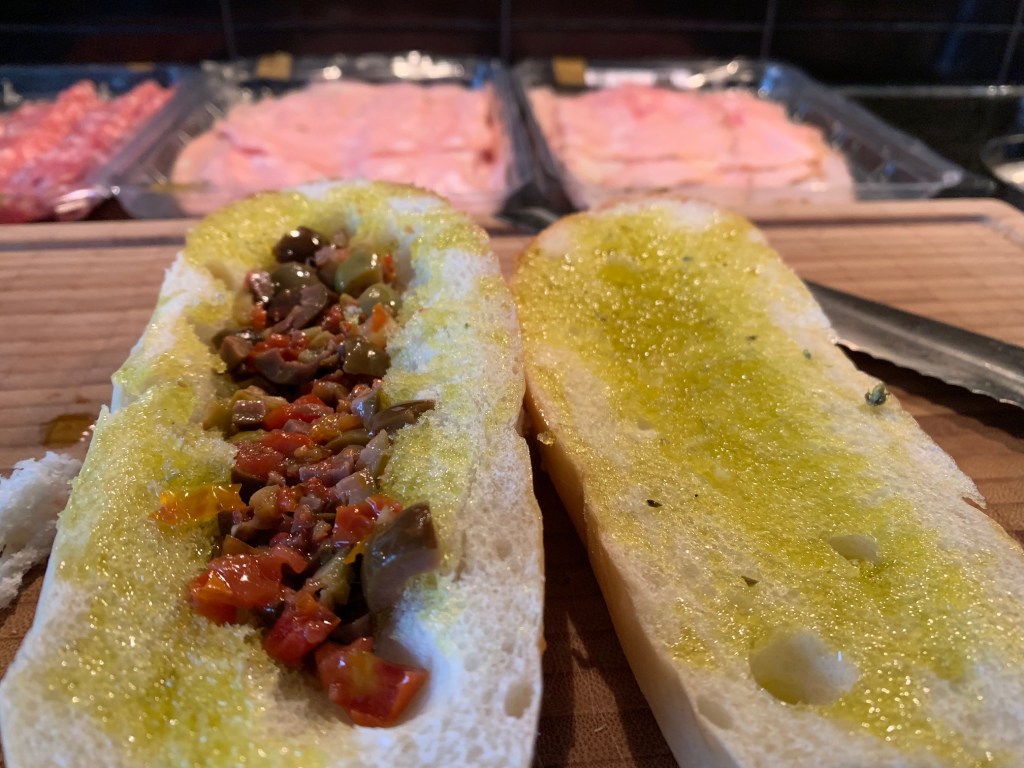
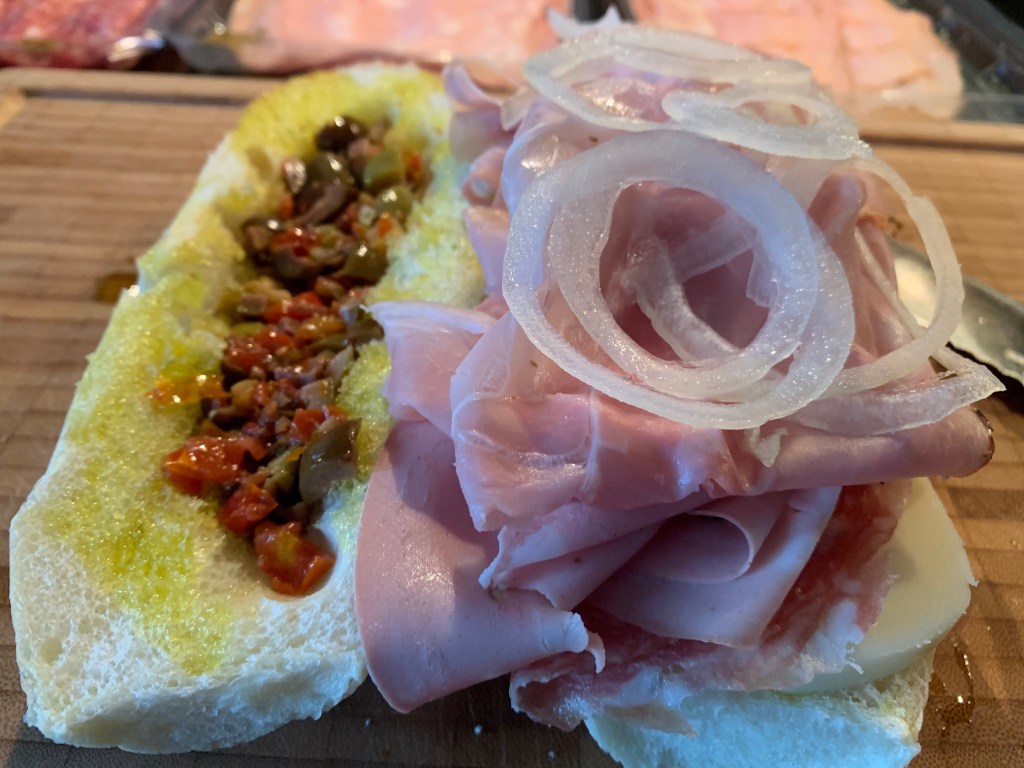
Look at these gorgeous mixed olives and sundried cherry tomatoes packed in olive oil. I decide to riff off of the muffuletta sandwich. I make a relish of olives (1 cup), sundried tomatoes (1/4 cup), and minced preserved lemon peel (1 tbsp).
I press my double-handed, rounded mincing knife into service because I have many talents, but fine knife skills aren’t among them. This knife is the reason I still have fingers.
Relish, coarsely chopped, is ready.
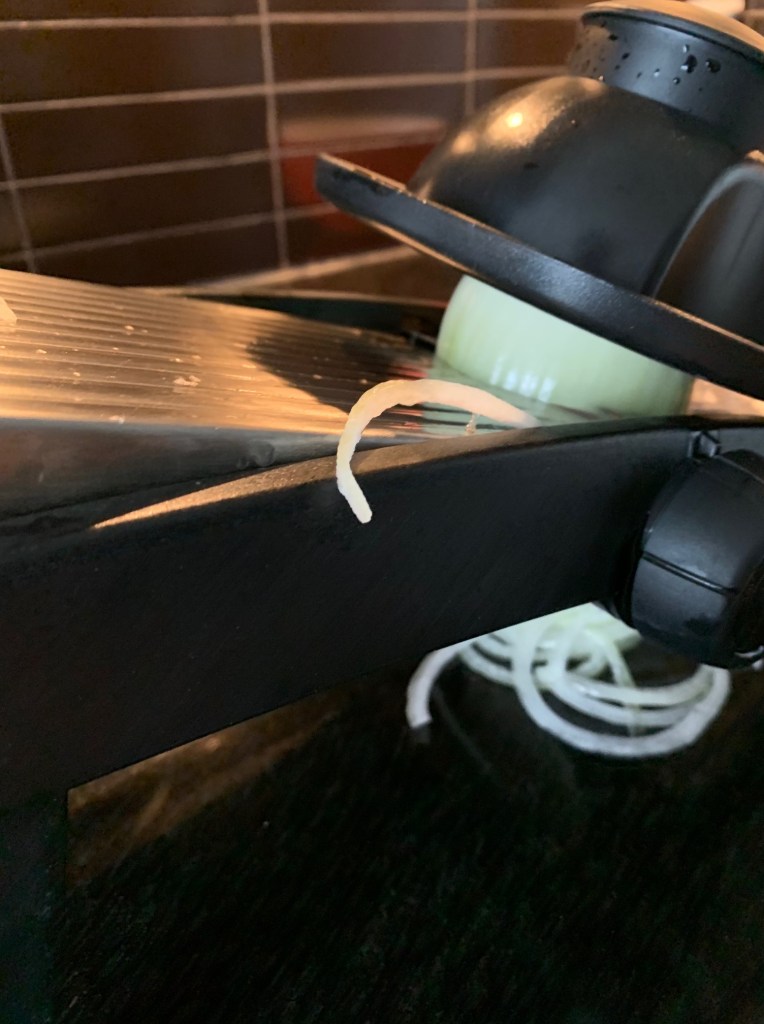
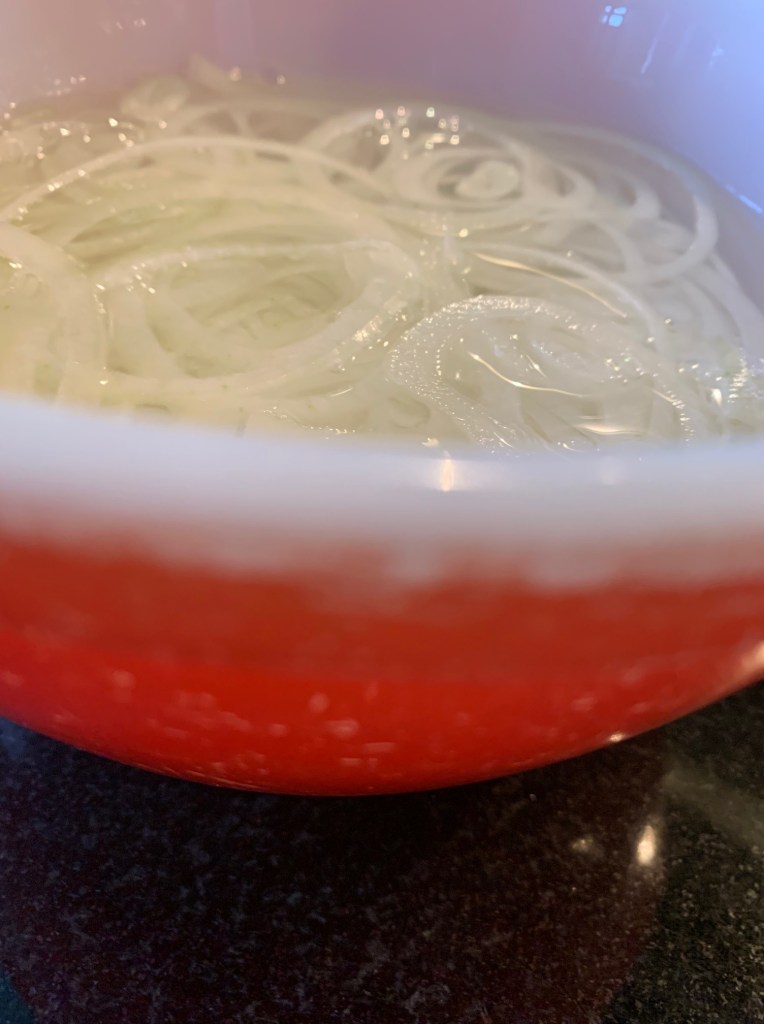
Most Italian hoagies include thinly sliced onions that are soaked in cold water to take the sting out of them. I like a brash onion but decide to give this method a try.
I break out my trusty mandoline for this job. It creates perfectly thin onion slices in a matter of seconds. And in they go to the water bath.
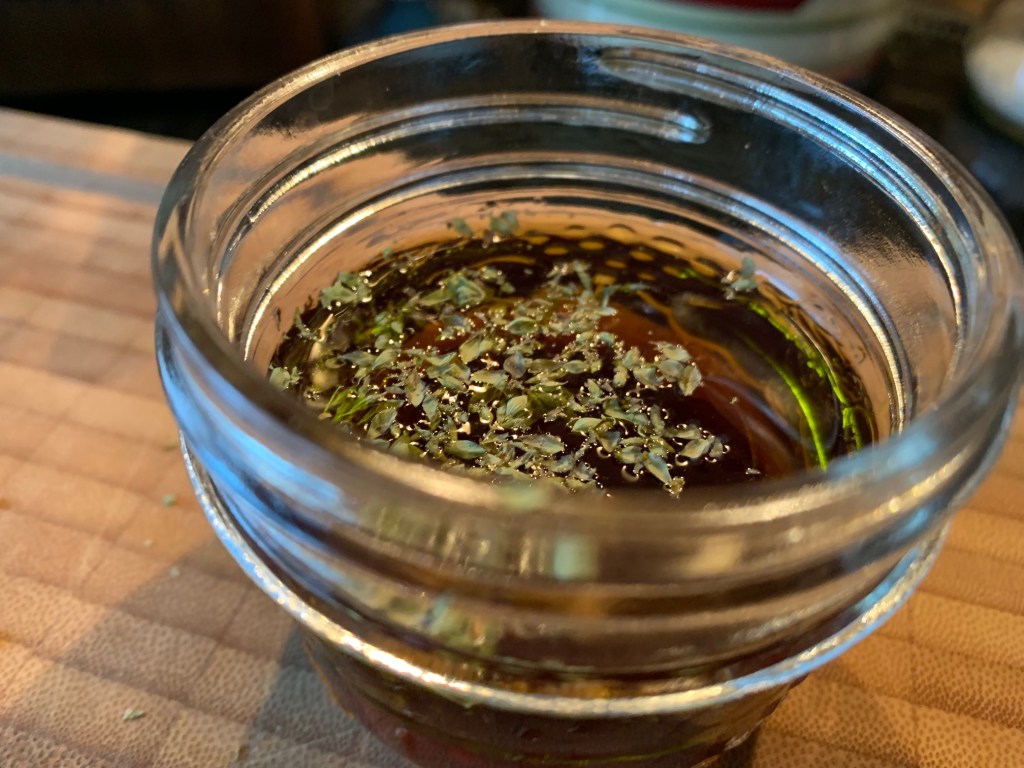
Now, what to put on the hoagie buns? Butter isn’t traditional here, nor is mayo. When I think cold cuts, I think mustard. Well, it is my favourite condiment. But that’s not traditional either. Buns are typically dressed with a homemade vinaigrette of olive oil and red wine vinegar or balsamic. Oregano also has a place on this sandwich, so I combine equal parts olive oil and red wine vinegar then about a 1 tsp of dried oregano that I also got from Eataly.
Now that my vinaigrette and all the fixings are in place, it’s time to build my sandwich. I slice open the hoagie bun and hollow out the bread in the upper bun. This will snuggle the olive relish. Then I slather my vinaigrette onto the insides of both buns.
My buns are brushed with vinaigrette and that lovely olive relish has found its new home. Time to start layering the stars of the show. On the bottom bun I place two slices of cheese, add a thin layer of salami (three slices), nestle the mortadella in twists so it’s kind of pillowy, then top it with the ham.
I’m not into cold cuts at all but this is looking good. Can’t forget the onions as the crowning glory.
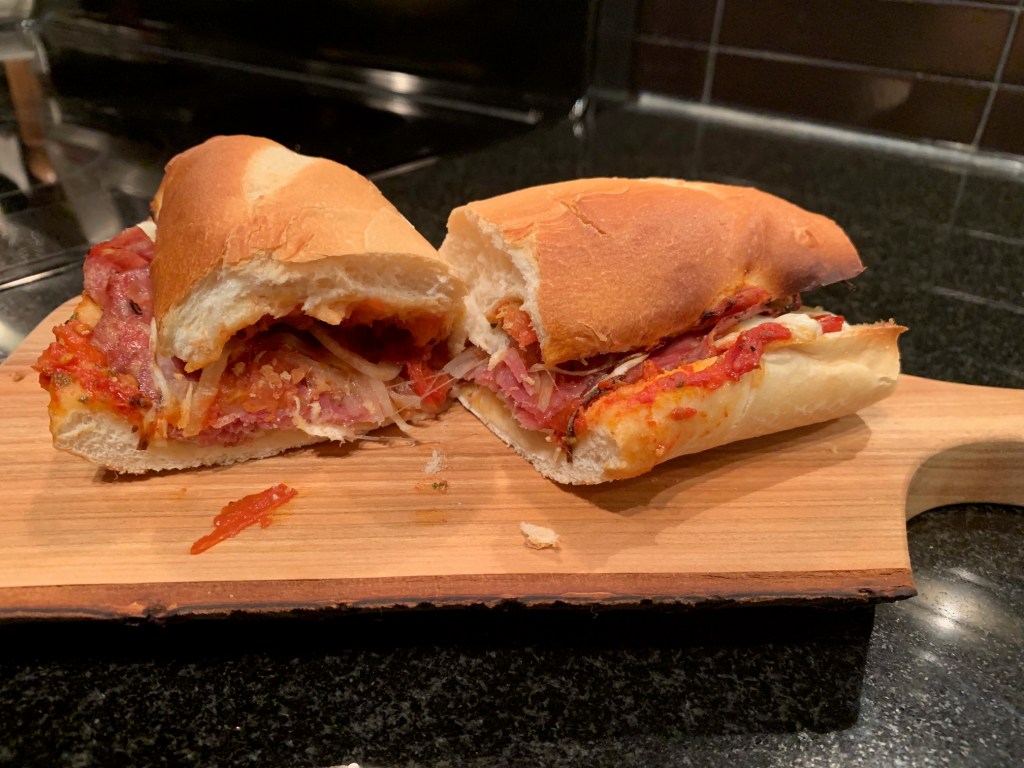
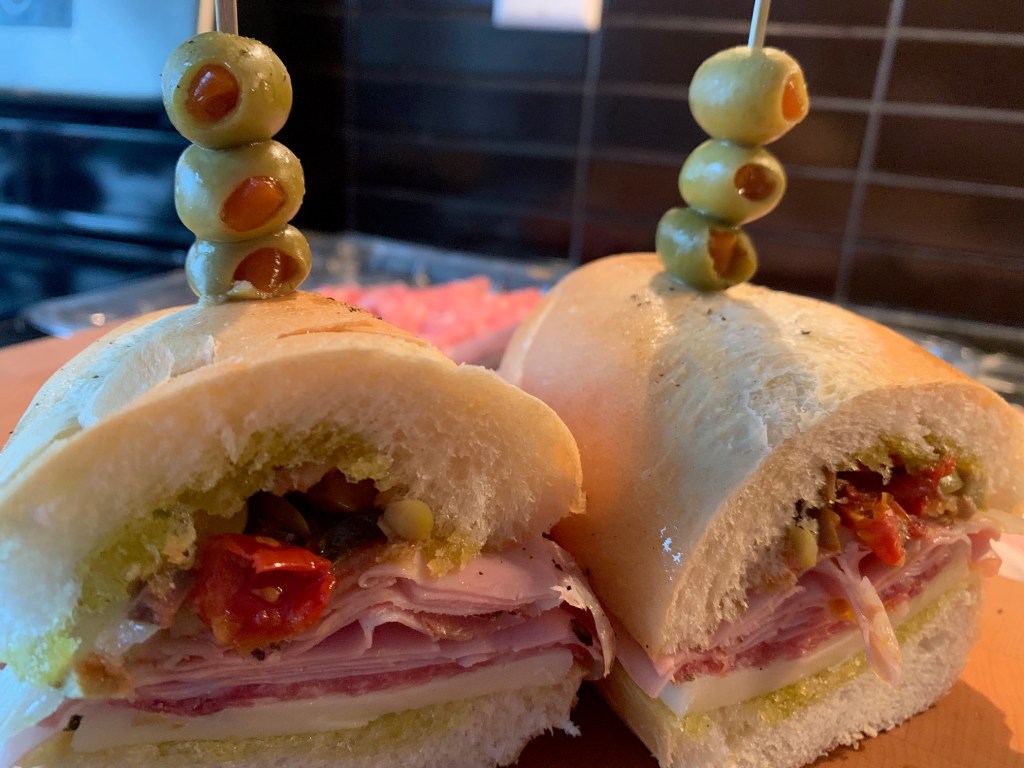
I cap that pile of decadence with the relish-filled upper bun, cut it in half like I’m the boss of it, spear three olives onto a skewer and pierce my very first Italian hoagie with the bamboo skewer for show, more than anything.
Time to eat. The hoagie holds many surprises. The meat and cheese balance each other out; the relish doesn’t overpower but cuts through the richness in a good way; the onions kind of get lost (not sure I’d soak them next time); and the vinaigrette make me (mostly) forget about the only reason I ever eat a meat sandwich—for the mustard. A good dijon would be perfectly fine with this.
It’s a very filling sandwich. Half a bun will do. You can make these ahead of time, wrap them tightly in plastic wrap, refrigerate, and pull them out during the game as if it was all oh so effortless. It wasn’t. Prep time took me an hour and I’m pretty efficient in the kitchen. But the effort was worth it.
Now if only my favourite team could be as winning as this sandwich.
When I announced that A Year in Sandwiches would feature 52 sandwiches, and that I would rank my top 10 at year’s end, I had a lot of requests for vegetarian sandwiches.
The majority of my diet is vegetarian but I have to say, when I think of a sandwich, I tend not to think about vegetables. I think mustard (my favourite condiment), cheese, chicken or meat.
Yes, the tomato sandwich at peak season is unbeatable. I love a simple cucumber and cream cheese sandwich. Grilled cheese? Forget about it.
But how to elevate a vegetarian sandwich in the middle of a snowstorm, when fresh vegetables are six months away?
I think: mushrooms. Most mushroom sandwiches that I google are a variation of a mushroom melt/panini. All good. Love. But could I experiment with the idea of a mushroom sandwich that might truly make it a contender for my top 10 sandwiches of 2020?
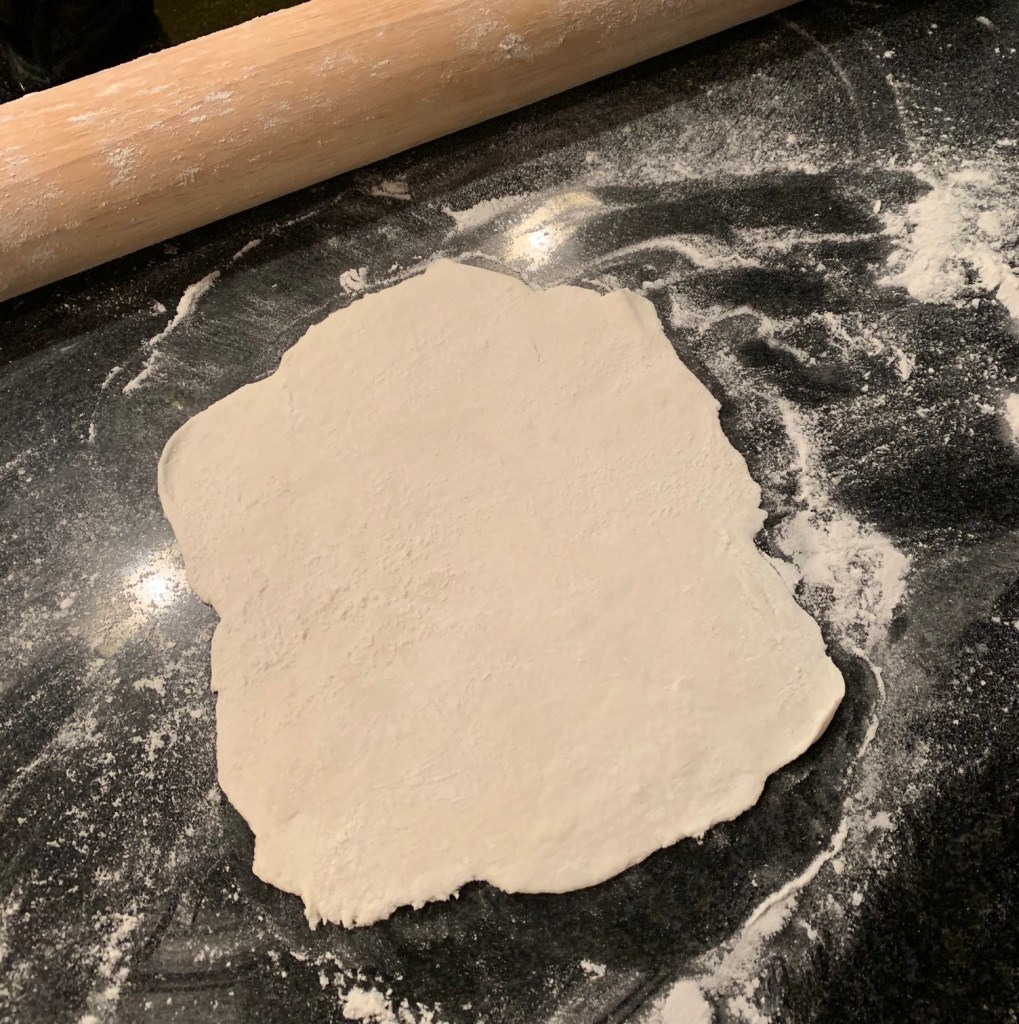
I remember that I have Ottolenghi’s amazing cookbook Plenty in my arsenal and that I once made the simplest of flatbreads from that book: greek yogurt, flour, salt, baking powder. I decide this will be my bread base.
Take 1 cup flour, add 1-1/2 tsp baking powder, 1/2 tsp salt, 3/4 cup greek yogurt. Mix with hands and knead for a minute or more (until it goes from shaggy to dough). Roll into a ball, protect it in plastic wrap and put it in the fridge for at least an hour.
A fridge with handmade dough, be it so ever humble, is a happy fridge.
My dough is chillin’, and now it’s serious thinking time: how do I make mushrooms the star of this dish but also give it a robust counterpoint flavour? You might as well know that whenever I deal with mushrooms it’s one of two ways: sauteed with butter and blue cheese, on toast, or marinated in a soy, garlic, lemon mash up with tofu, later grilled or roasted.
I want more from today’s sandwich. I spend hours looking up mushroom sandwiches, sauces, salads and remain unsatisfied.
I keep going back to my chosen bread base: the homemade flatbread. And it makes me long for a shawarma sandwich in Ottawa, with true Lebanese influences. What I love second-most about a great shawarma is the garlic sauce (love the turnip pickle the most, true story).
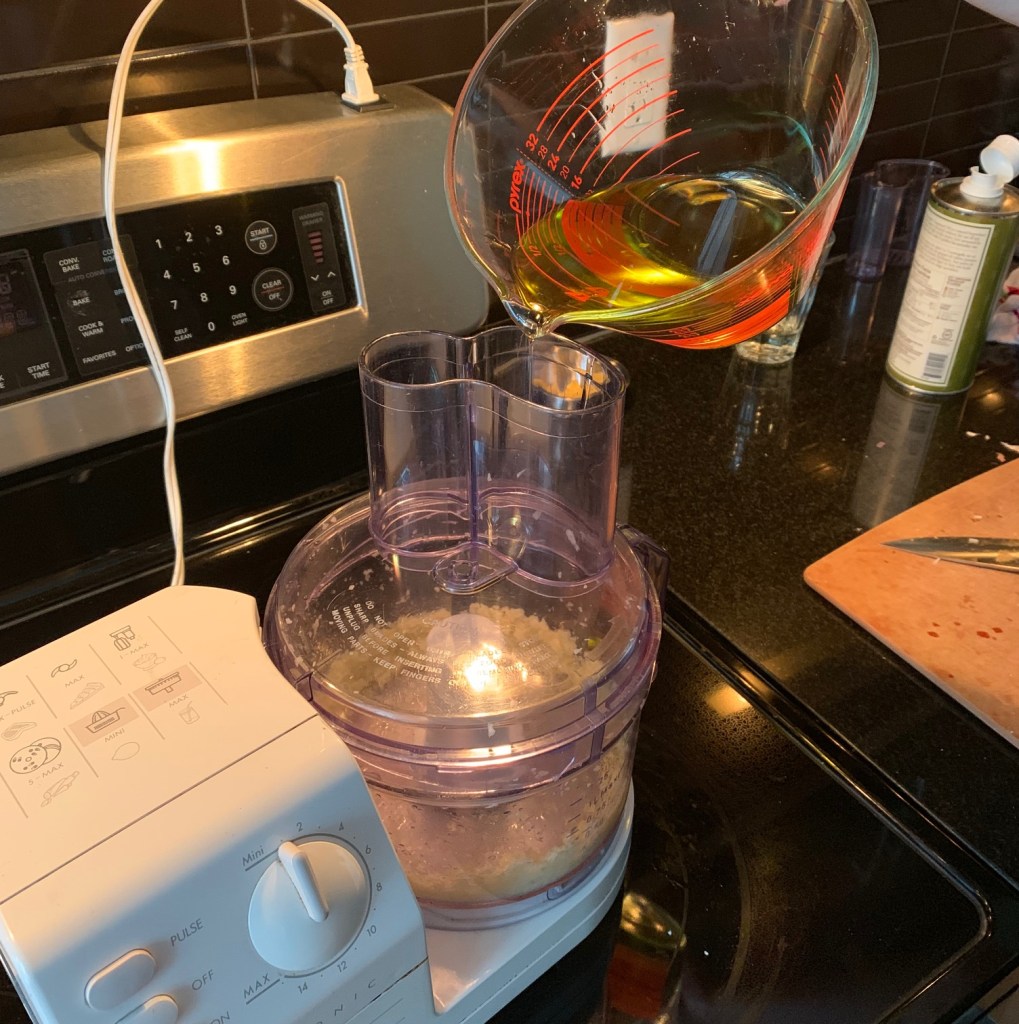
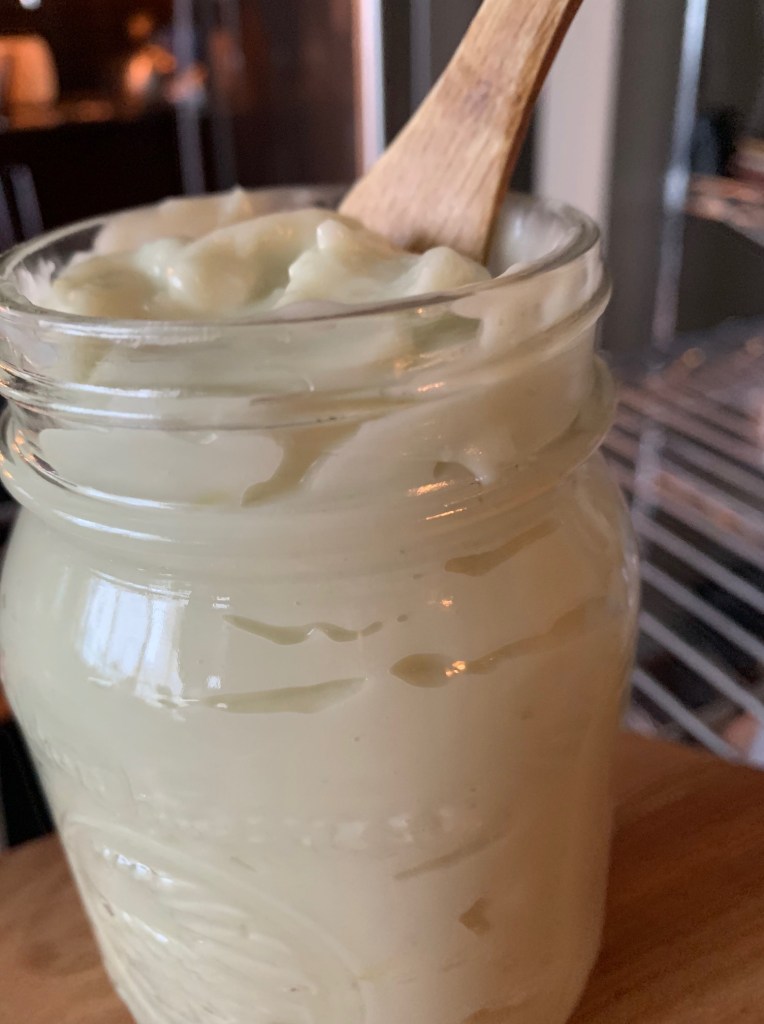
Toum. That is the name for a Lebanese garlic sauce. It’s unapologetically garlicky, fluffy, light. When I first encountered it I thought it was a variation of a homemade mayo but, in fact, Toum isn’t made with eggs. It consists of four simple ingredients: Lots of garlic, a hint of salt, lots of vegetable oil, and lemon juice. But to properly emulsify, you take slow turns adding ingredients into your food processor.
I almost didn’t make the Toum because it leans heavily on your food processor, and my Cuisinart is now 27 years old (look how grand it still is!). It’s a workhorse but I ask myself: can it withstand about 15 minutes of steady processing or will Toum kill my old trusty? I decide to risk it. I’ll spare you the drama: it worked out!
I made a jar full of Toum, which will last a month but could also be frozen. It is very, very garlicky, so it is not for the faint of heart. I think it’s the best jar of anything I have ever made.
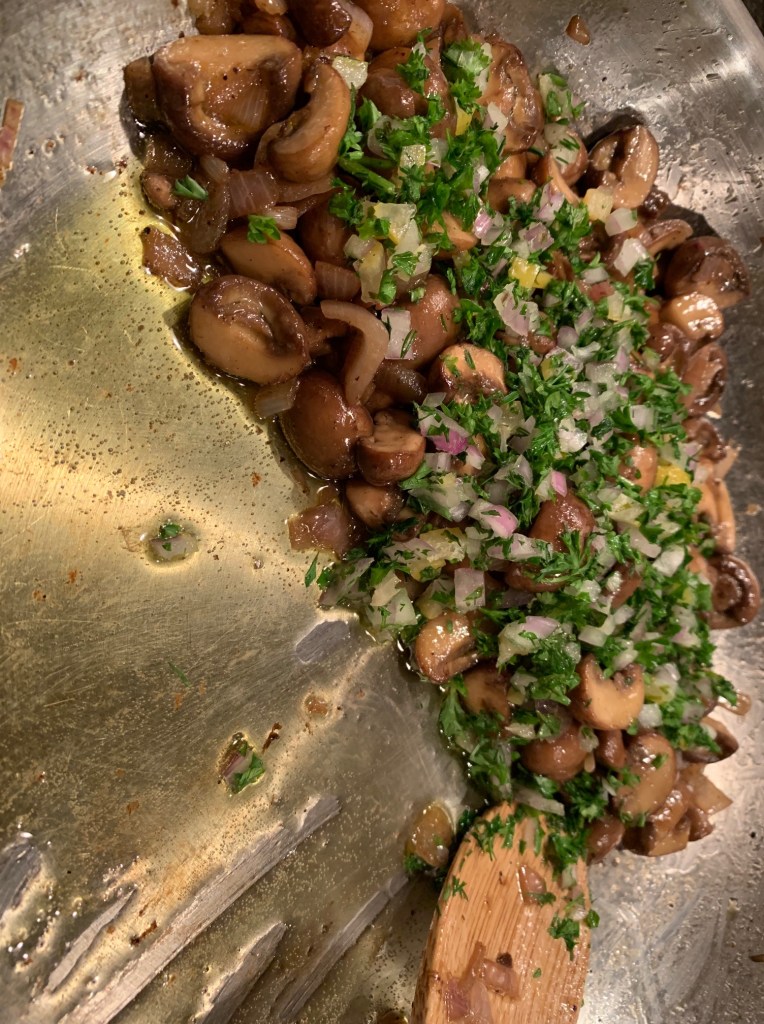
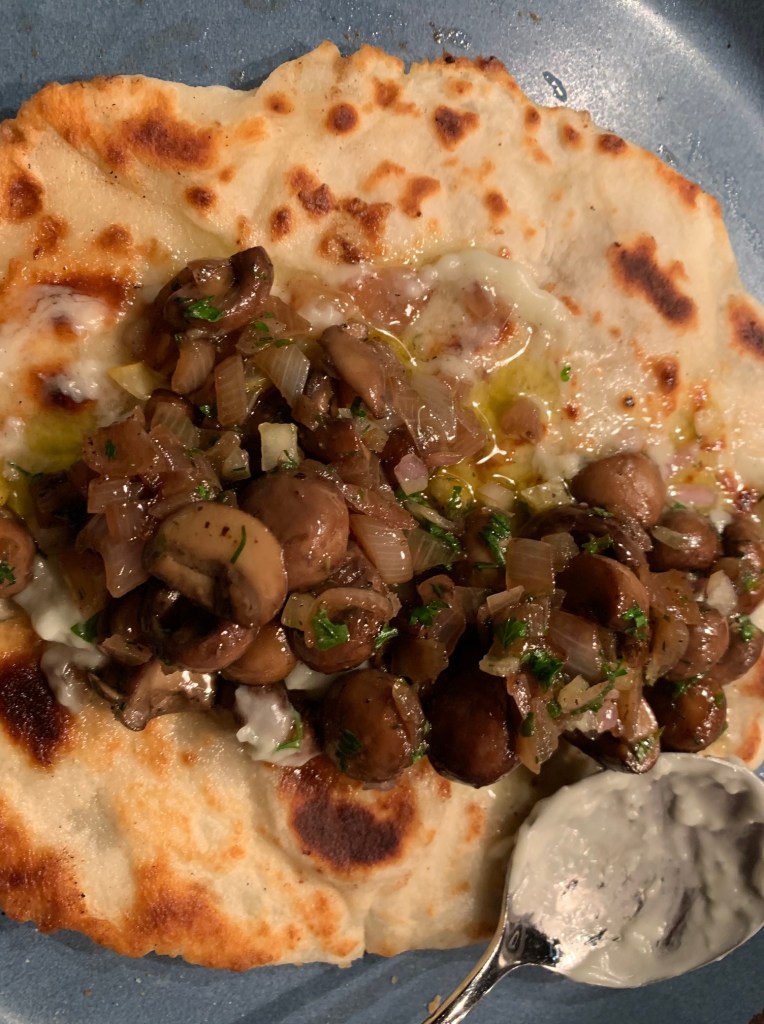
I am doing a straightforward treatment of my mushrooms: sautee about 2 cups of chopped mushrooms with a mix of butter and oil until the mushrooms release their juices and those juices reduce to almost nothing, then add about 1/4 cup white wine and let that reduce until there are almost no juices left.
For brightness I add an herb salad of: 1 tbsp fresh tarragon, 2 tbsp fresh dill, 3 tbsp fresh chopped parley, 1 tbsp minced preserved lemon peel, juice of one lemon. Toss that into the mushroom mixture.
This isn’t your everyday sandwich–it’s a weekend project, so schedule your time accordingly. Nightfall is descending and it’s time to turn my project into a sandwich. That means pulling the dough out of the fridge, pulling it apart to make six small mounds, then rolling each mound onto a floured surface to create my flatbread.
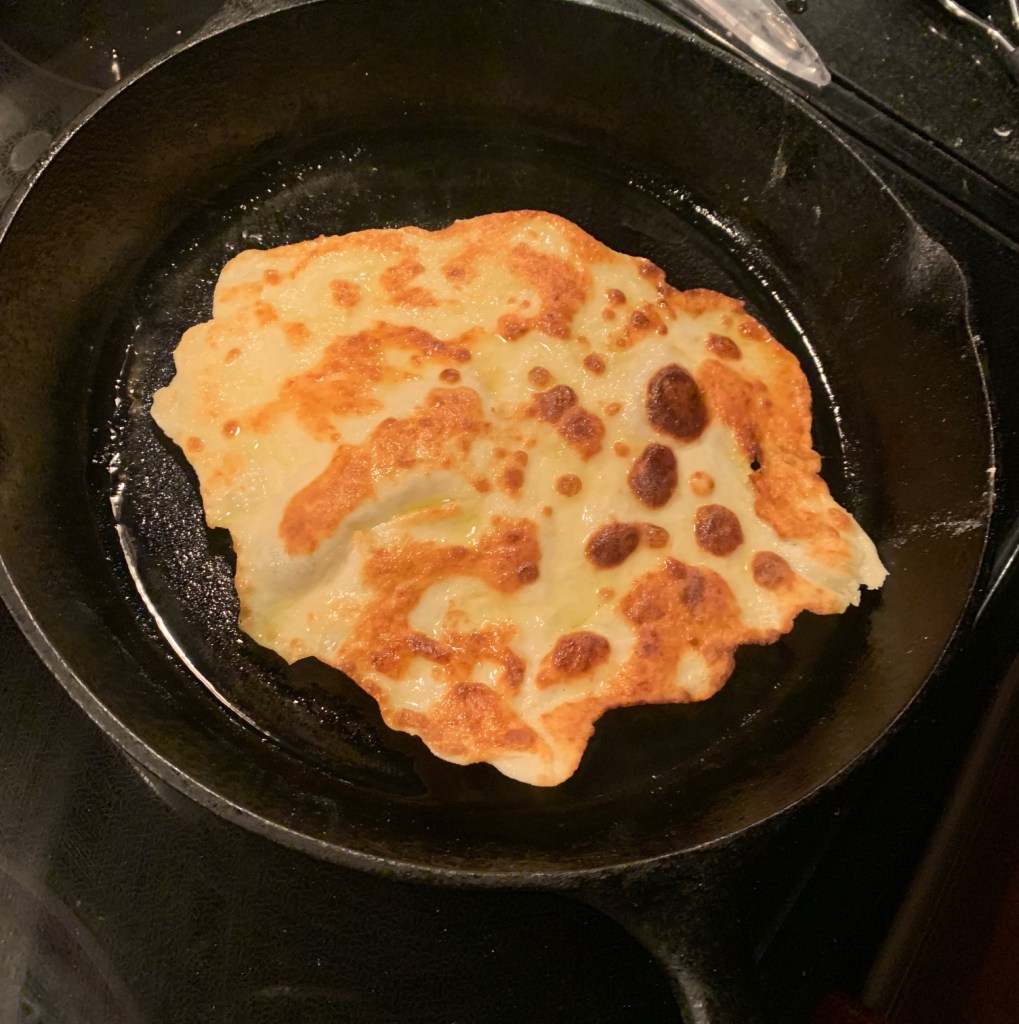
Cast iron pan goes onto the stovetop, filled with olive oil base upon which to fry the flatbread.
How great does that look?
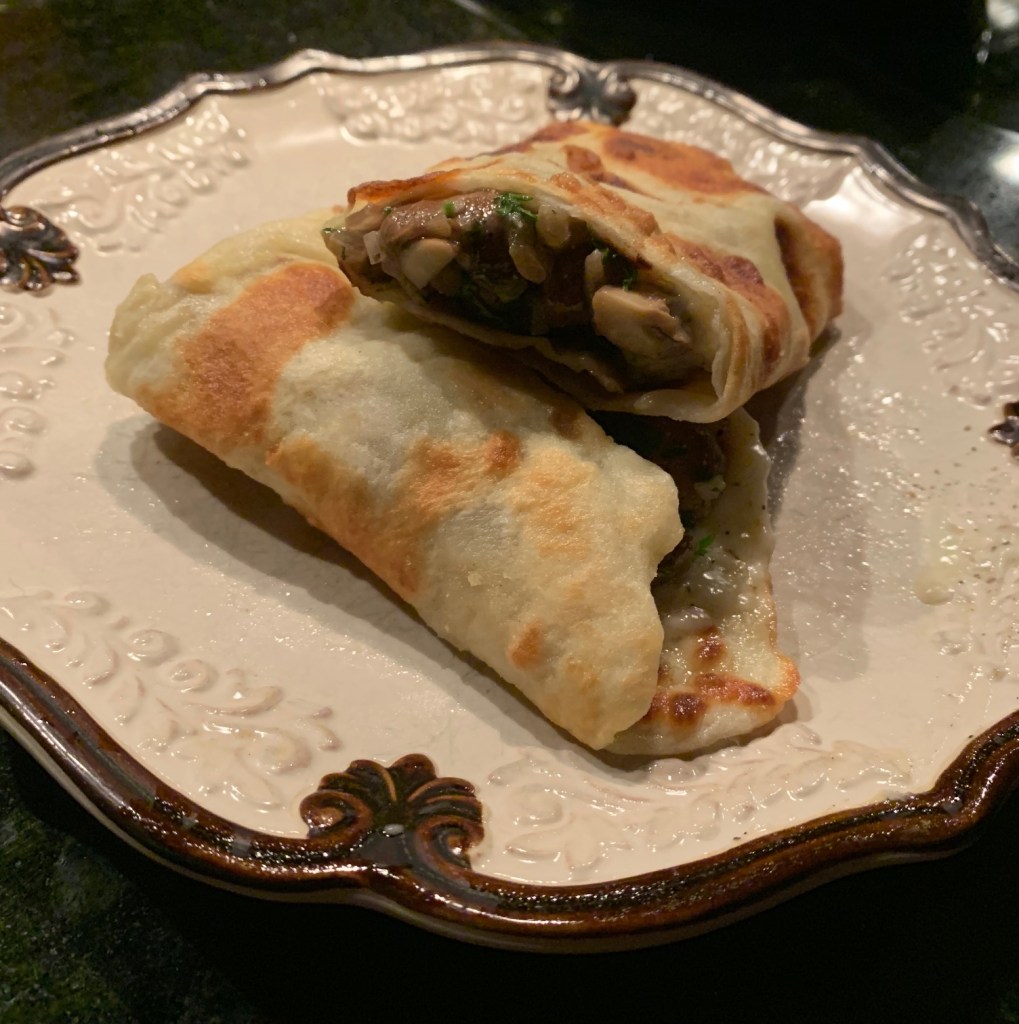
Now to build my mushroom flatbread: schmear of Toum garlic sauce in the middle of the hot flatbread, spoon in the mushroom mixture.
I’m getting hungry. Now roll up the flatbread, cut in half, eat and share!
That’s the best vegetarian sandwich I have ever had, let alone made (tomato sandwich in peak season notwithstanding, because that’s not a fair contest).
One small critique: it was a bit drippy. I like a messy sandwich but if you don’t, I recommend scooping the mushrooms with a slotted spoon to reduce the amount of juices in the flatbread.
Suggested modifications: Maybe you want this mushroom sandwich but don’t want to make the toum or the flatbread. That’s fine. Mayo (with added garlic if you like) would be a fine sauce substitute, as would yogurt or tzatziki. Naan bread, pita, or wraps could substitute for the flatbread–but the flatbread here was part of what made this sandwich amazing.